


How to Install an Aluminum Carport in Alpine
For aluminum carport installation in Alpine, start by checking Alpine City’s permit and placement rules and confirming the design can handle the site’s snow and wind loads. Then level the site, plan drainage, install the specified footings and anchors, and assemble the frame and roof to the approved plans. Do not guess at footing depth or anchor size; those details depend on the site and the carport design.
For aluminum carport installation Alpine homeowners can rely on, we’re Awnings Unlimited, a Salt Lake City-based family business installing custom carports across Utah and Wyoming. Since 1976, we’ve focused on durable materials, professional installation, and a strong warranty.
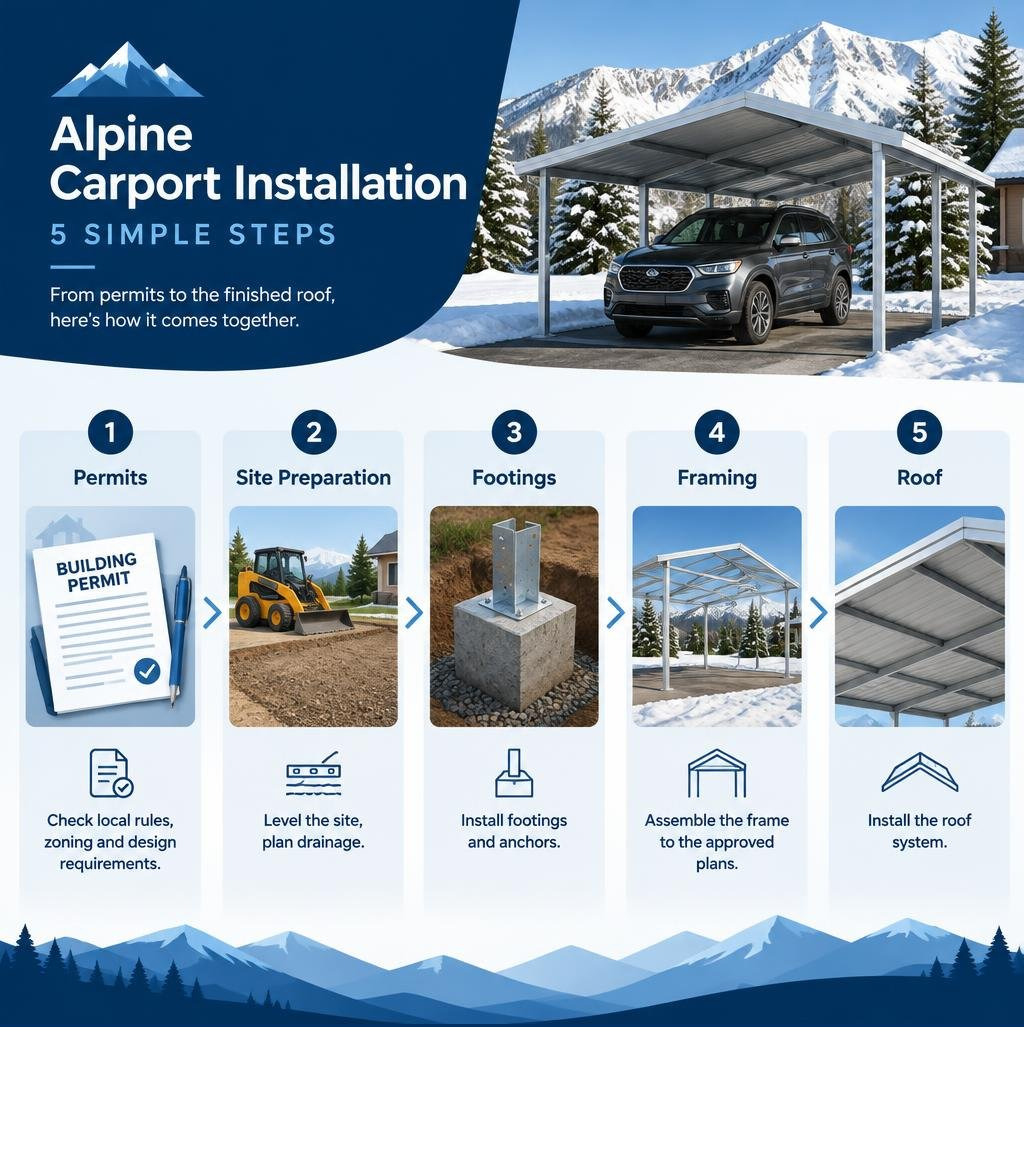
Alpine Building Codes, Permits, and Site Planning
Installing a permanent shade and snow structure in Alpine requires thoughtful planning before breaking ground. Nestled against the rugged Wasatch Range, Alpine experiences intense seasonal shifts, ranging from scorching summer sunshine to heavy, wet winter blizzards. Because of these distinct conditions, Alpine City enforces specific building codes to ensure accessory structures remain safe year-round.
Before beginning any construction, you must verify the local zoning requirements for your property. Alpine City regulates accessory structures regarding height limits, lot coverage percentages, and setback distances from property lines. In most residential zones, detached or attached carports must maintain designated clearances from side and rear property boundaries. If your property is part of a Homeowners Association (HOA), you will also need to submit your architectural plans for HOA review to confirm that the roof style, color, and placement conform to neighborhood design covenants.
Securing a building permit is mandatory for permanent carports in Alpine. Navigating the municipal process is straightforward when you review our Utah carport installation guide and submit a complete Alpine City building permit application.
When drafting your site plan, pay careful attention to the frost line depth. In Northern Utah, the frost line typically reaches 30 inches or deeper below grade. Footings must extend beneath this freezing zone to prevent frost heave from destabilizing your support posts during freezing winter nights and spring thaws.
Site Preparation for Alpine’s Mountain Terrain
Alpine’s topography often features natural slope transitions, rocky soil profiles, and elevated moisture levels during the spring melt. Proper ground preparation prevents water pooling, foundation shifting, and structural strain over the life of your shelter.
- Clear and Level the Work Area: Remove all organic debris, turf, large rocks, and loose topsoil from the footprint of your build. Grade the area to establish a subtle slope—ideally a one- to two-percent grade away from your home’s foundation—to direct surface water run-off safely away from the parking pad.
- Soil Compaction and Base Stabilization: If you are installing on bare ground or a gravel pad, compact the sub-base thoroughly using a mechanical plate compactor. Alpine’s loose gravelly loam requires solid mechanical compaction to support the dead and live loads of your vehicle and the structure above it.
- Inspect Existing Concrete: If you plan to anchor directly onto an existing concrete driveway or parking slab, inspect the surface closely. The pad should be free of major structural cracks, spalling, or settling, and must meet the minimum thickness specified by structural engineering standards (typically four inches or more of reinforced concrete).
- Mark Underground Utilities: Always contact utility locating services (call 811) before digging footing holes. Striking electrical lines, gas pipes, or irrigation lines poses severe safety hazards and can delay your project significantly.
Essential Tools and Materials for Aluminum Carport Installation in Alpine
Proper installation requires specialized tools capable of handling structural aluminum framing and solid masonry anchoring:
- Heavy-duty rotary hammer drill and masonry drill bits: For drilling clean, precise holes into concrete pads or deep footings.
- Wedge anchors or heavy concrete screw fasteners: Engineered for high-shear and high-uplift resistance in alpine wind conditions.
- Structural post base brackets: Heavy-gauge brackets designed to isolate aluminum posts from prolonged ground moisture.
- Impact driver, socket sets, and hex drivers: To securely tighten structural fasteners without stripping the hardware.
- Precision laser level, post levels, and chalk line: Essential for establishing plumb vertical posts and true horizontal beams.
- Alumawood structural extrusions and roof components: High-strength aluminum posts, header beams, side fascias, and interlocking roof pans engineered to withstand Northern Utah snow loads.
- Safety gear: Sturdy ladders, fall-protection equipment, cut-resistant gloves, eye protection, and work boots.
Step-by-Step Aluminum Carport Installation Alpine Guide

A successful build relies on an orderly, systematic workflow. When installing durable aluminum carports in Alpine, Utah, precision at the foundation level guarantees seamless alignment all the way through the final roof cap.
Anchoring Posts to Resist High Wind and Snow Loads
Alpine frequently encounters strong canyon wind gusts sweeping off the mountains alongside heavy winter snow accumulation. For this reason, the anchoring system serves as the backbone of structural safety.
When working with experienced custom carport builders in Northern Utah, structural base plates are anchored directly to concrete footings poured well below the local frost depth.
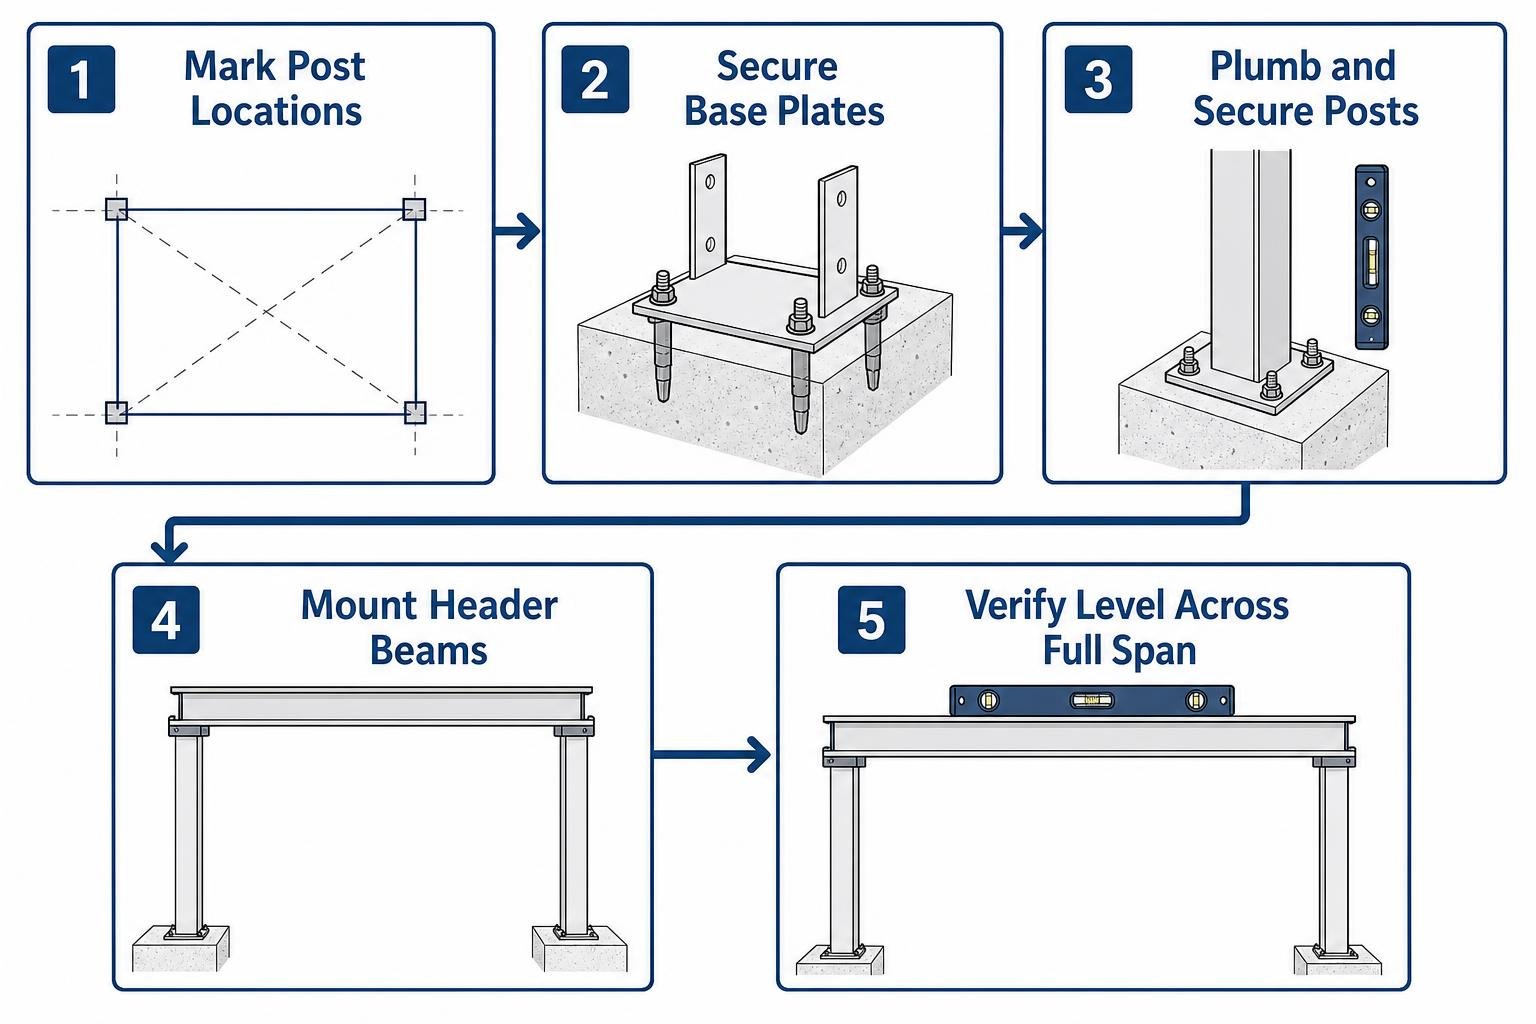
- Mark Post Locations: Use a builder’s square and chalk lines to map your layout. Measure diagonally from corner to corner to verify the perimeter is perfectly square.
- Secure Base Plates: Drill holes into the concrete footings using your rotary hammer. Clear all masonry dust from the holes before inserting heavy-duty wedge anchors. Torque the bolts to the engineering specifications to ensure maximum pull-out resistance.
- Plumb and Secure Posts: Seat the aluminum support posts into the base brackets. Use a post level on multiple sides of each column to ensure perfect vertical alignment before securing the hardware.
- Mount Header Beams: Lift the main aluminum header beams onto the post saddles. Verify horizontal leveling across the full span to ensure roof loads distribute evenly across all structural posts.
Assembling and Sealing the Aluminum Roof Panels
Once the supporting skeleton stands plumb, level, and securely fastened, roof installation begins.
For high-altitude durability, interlocking solid panels—such as our flat pan awnings and patio covers—deliver exceptional structural strength.
- Install Wall Attachment or Rear Ledger: If attaching the carport to an existing home or garage wall, securely lag the ledger beam into the building’s structural wall studs or rim joist. Install continuous flashing under the home’s exterior siding and over the ledger to prevent water intrusion.
- Interlock Roof Panels: Lay the aluminum flat-pan panels across the support framework sequentially. Slide the male and female interlocking edges together until they snap tightly into place. These interlocking joints provide a water-tight seal and distribute snow weight evenly across the entire roof plane.
- Fasten the Roof Surface: Secure each panel to the framework using weather-sealed structural screws equipped with neoprene washers. Avoid over-torquing, which can warp the aluminum or compress the washer excessively.
- Attach Perimeter Fascia and Gutters: Fasten heavy-duty perimeter fascia around the outer edges of the roof pans. Integrate a front gutter channel and downspout assembly to guide heavy rain and melted snow cleanly away from the foundation.
- Apply High-Grade Sealant: Apply exterior-grade structural polyurethane sealant along all ledger joints, panel end caps, and flashing seams to protect against moisture intrusion during freeze-thaw cycles.
Timelines, Common Mistakes, and Long-Term Care
Understanding the installation process and ongoing performance expectations helps ensure your investment provides dependable shelter for decades. The table below outlines key expectations for aluminum carport projects in Alpine:
| Metric / Phase | Aluminum Carport Detail |
|---|---|
| Typical Installation Time | 1 to 2 days for a standard unit (after concrete footing cure) |
| Average Lifespan | 30 to 50 years with minimal routine care |
| Weight Advantage | 30% to 40% lighter than steel, easing installation logistics |
| Key Maintenance Tasks | Annual rinse, gutter clearing, visual fastener inspection |
| Material Durability | Natural rust resistance, non-combustible, UV-resistant finish |
To avoid unexpected complications during assembly, keep these aluminum carport installation tips in mind:
- Underestimating Footing Depths: Pouring shallow footings above the frost line can lead to severe frost heave, causing the carport to twist out of square as the ground freezes and thaws.
- Ignoring Drainage Pitch: Roof panels must have an intentional downward slope toward the gutter system. Inadequate pitch causes water to pool, accelerating debris buildup and risking seam leaks.
- Over-Tightening Hardware: Excessive torque can dent lightweight aluminum extrusions and crush rubber sealing washers, creating pathways for leaks.
- Skipping Utility Checks: Neglecting to locate buried power, gas, or sprinkler lines before digging footings can lead to expensive property damage and safety hazards.
Ongoing Maintenance in Alpine’s Alpine Climate
One of the greatest advantages of aluminum structures is their low maintenance burden. Over 60% of homeowners in Alpine regions choose aluminum carports for their superior rust resistance in high-moisture and snow-heavy environments. Aluminum carports routinely provide 30 to 50 years of service.
To keep your structure in peak condition:
- Manage Heavy Snow Packs: While engineered aluminum panels handle substantial weight, clear excess buildup after severe blizzards using a soft-bristled roof rake to prevent stress on roof seams.
- Keep Gutters Clear: Remove autumn leaves, pine needles, and mountain debris from the perimeter gutters each spring and fall to ensure melted snow drains freely.
- Perform Annual Fastener Checks: Walk around the structure once a year to confirm all anchor bolts and panel fasteners remain snug.
- Rinse the Finish: Use a garden hose and mild household soap once a year to wash away windblown dust and environmental residue, keeping the baked-on finish looking fresh.
Professional vs. DIY Aluminum Carport Installation in Alpine
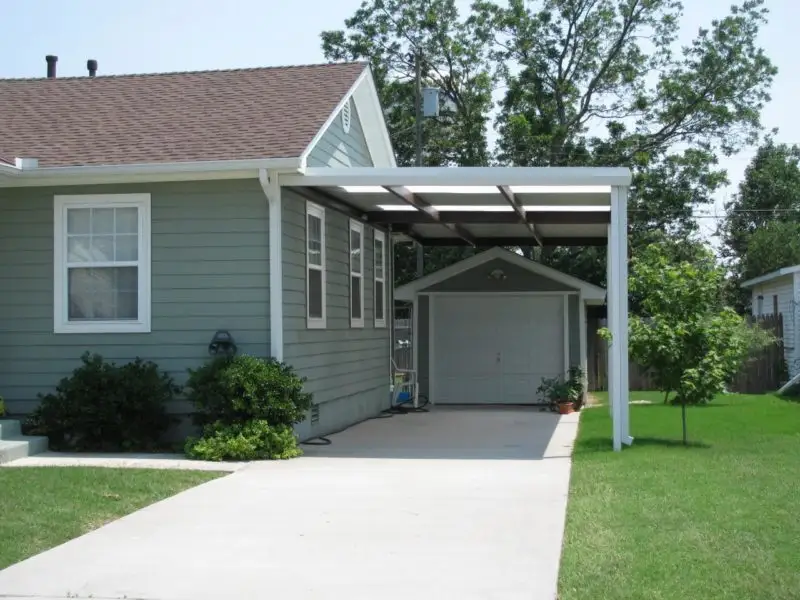
Alpine’s elevation and winter climate introduce challenges that make professional installation a wise choice.
Engineering calculations for wind uplift and localized snow loads require strict adherence to local building codes.
Professional crews bring specialized equipment to set footings accurately, verify structural attachments, and finish the job in just one to two days. Working with experienced professionals also protects you with comprehensive manufacturer and labor warranties. When evaluating your options, review our guide on how to choose professional structural awning installers in Alpine to understand what makes a qualified contractor.
Frequently Asked Questions About Alpine Carport Installation
What are the snow load requirements for a carport in Alpine?
Alpine sits at a high elevation along the Wasatch Front, meaning snow load ratings vary depending on your specific location and proximity to the mountain benches. Structures typically require engineering for ground snow loads ranging from 40 to 60 pounds per square foot (psf) or higher in bench areas. Always check Alpine City building department tables to confirm your property’s specific requirement.
Do I need a building permit to install an aluminum carport in Alpine?
Yes. Alpine City requires a building permit for all permanent accessory structures, including freestanding and attached carports. The permit process ensures your carport complies with local building codes, frost depth guidelines, setbacks, and snow and wind load standards.
How long does an aluminum carport installation take to complete?
For a standard single-car or double-car unit, the physical assembly of an aluminum carport typically takes between 1 and 2 days. If new concrete footings or a new parking slab must be poured first, allow an additional 3 to 7 days for the concrete to cure properly before mounting framing posts and heavy roof panels.
Conclusion
Installing a durable aluminum carport provides reliable protection against Alpine’s harsh winter storms, hail, and high-altitude UV radiation. An aluminum shelter delivers long-term durability with low routine maintenance. Beyond preserving your vehicles, adding an aluminum carport can increase property value by up to 5% to 10% across mountain communities where protected parking is highly sought after.
At Awnings Unlimited, our family-owned team has served Utah and Northern Utah homeowners since 1976. We specialize in rugged, beautiful Alumawood structures built to handle our mountain climate. Ready to upgrade your property with year-round shelter? Contact us today to request a custom carport estimate tailored to your Alpine home.