

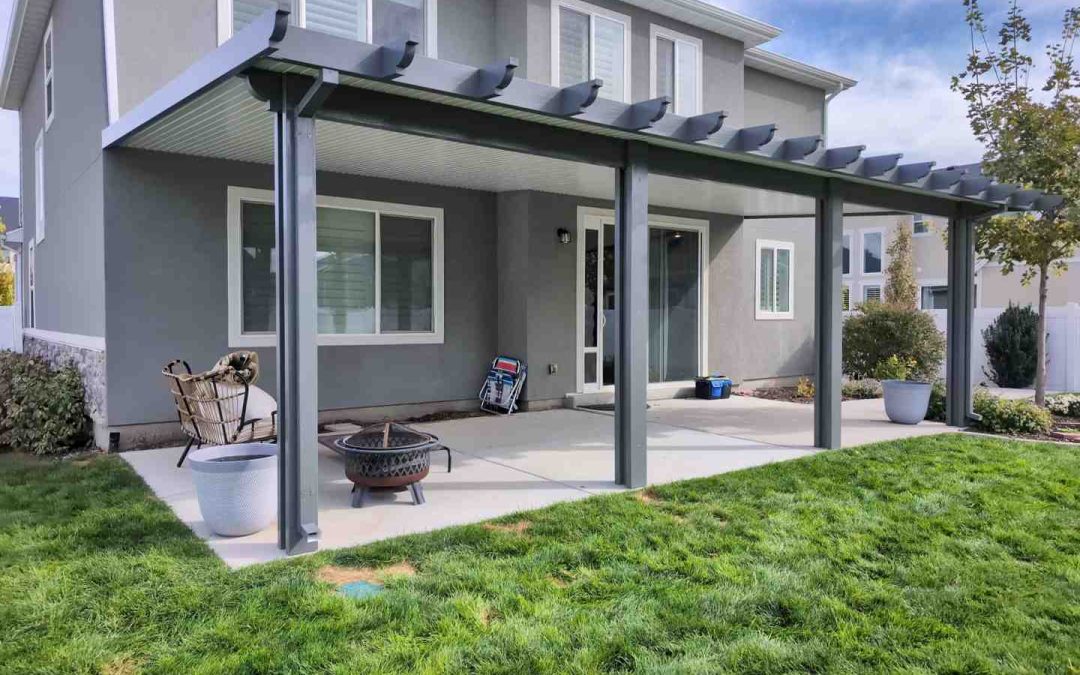
Why a DIY Patio Overhang Is Worth Building
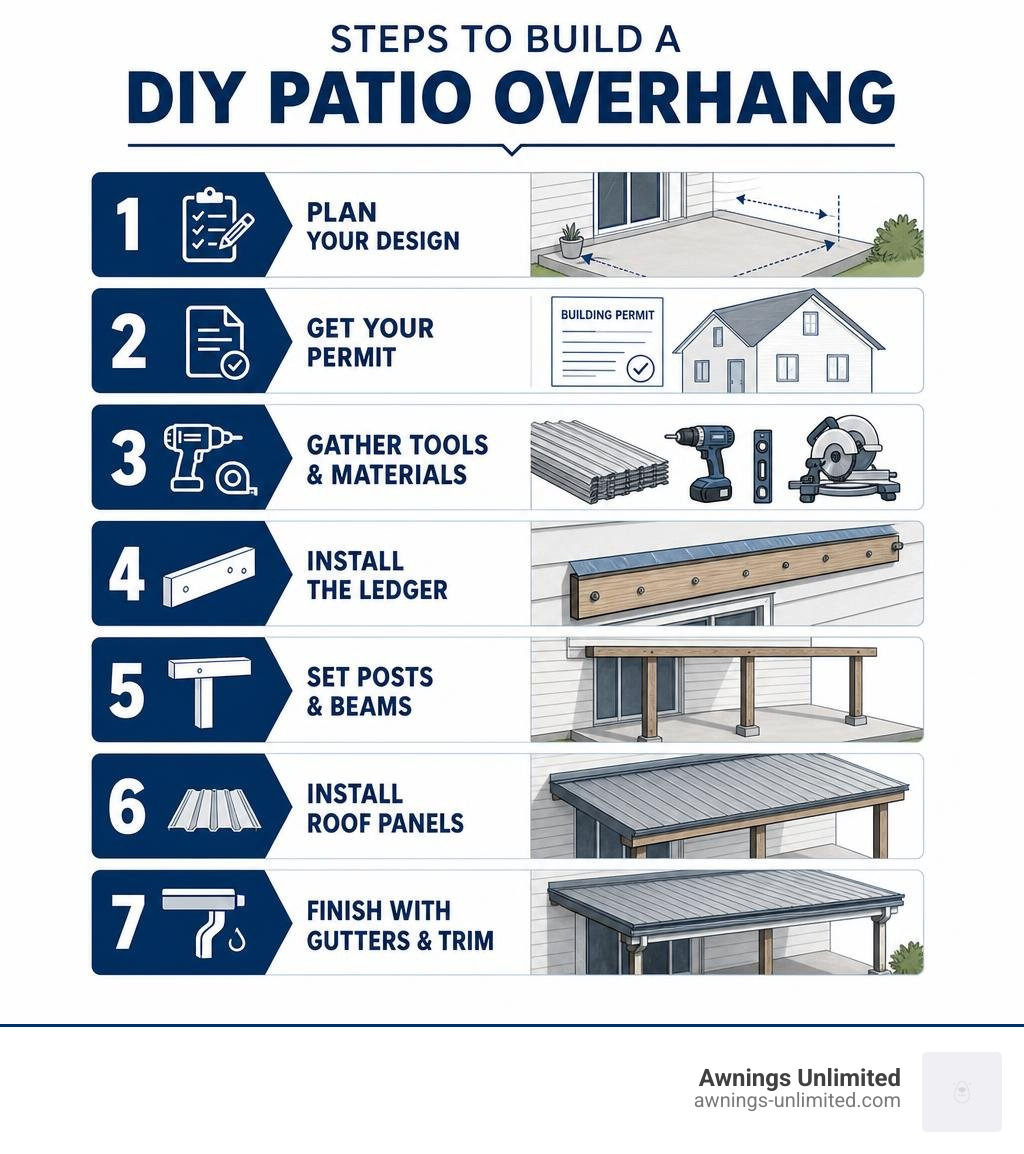
Building a DIY patio overhang is one of the highest-value home improvement projects you can take on. Here’s a quick overview of what’s involved:
Quick-start summary:
- Plan your design — measure your patio, check local building codes, and choose your materials
- Get your permit — most attached structures over 120 sq ft require one
- Gather tools and materials — aluminum or Alumawood kit, drill, level, chalk line, miter saw
- Install the ledger board — secure it to the house with proper flashing and sealant
- Set posts and beams — anchor posts in concrete footings, attach the header beam
- Install roof panels — snap in interlocking panels with a 3:12 pitch for drainage
- Finish with gutters and trim — seal all connections and clear the site
Your patio sits unused half the year. Rain, harsh sun, and blowing snow push you back inside — and your outdoor furniture pays the price.
A solid, attached patio overhang fixes that. It extends your usable outdoor living space by 30–50% year-round, according to surveys of DIY homeowners. It can also cut outdoor cooling costs by up to 20% by blocking direct sunlight. And compared to hiring a contractor (average cost: $5,000), a DIY kit typically runs $1,500–$3,000 — real savings for a real upgrade.
The catch? It needs to be done right. A poorly planned overhang can leak, sag, or fail to meet local building codes. This guide walks you through every step.
At Awnings Unlimited, we’ve been helping Northern Utah homeowners build and install durable, low-maintenance patio covers since 1976 — so we know exactly what separates a DIY patio overhang that lasts decades from one that causes headaches. Whether you choose to build it yourself or have our team handle it, we’ll make sure you start with the right information.
Understanding Patio Overhangs: Benefits, Costs, and Comparisons
Before you grab your drill, it is important to understand what kind of structure best fits your lifestyle, budget, and local weather conditions. If you live along the Wasatch Front—from Salt Lake City UT to Ogden UT or Provo UT—you know our weather can swing from scorching summer heat to heavy, wet winter snow.
Choosing between a solid patio overhang and an open-air pergola comes down to how you plan to use your space. A pergola with an open lattice design offers partial shade and a classic aesthetic, but it will not protect your outdoor dining set from a sudden Utah downpour or winter snow accumulation. On the other hand, a solid aluminum patio overhang provides total weather protection, ensuring your patio remains fully dry and usable no matter what is falling from the sky.
When you install a solid, weather-resistant cover, you are not just adding shade; you are protecting your home’s interior from solar heat gain. By blocking direct sunlight before it hits your windows, you can reduce indoor cooling costs by up to 20%.
To help you choose the right material for your backyard upgrade, check out our comparison of high-quality aluminum options below:
| Feature | Solid Aluminum Panels | Insulated Laminated Panels (LRP) | Alumawood (Wood-Grain Aluminum) |
|---|---|---|---|
| Durability | Extremely high; will not rust, rot, or warp | High structural strength; handles heavy snow | Outstanding; resists peeling, termites, and cracking |
| Maintenance | Minimal; simple seasonal wash with water | Low; occasional cleaning of gutters and panels | Virtually zero; looks like painted wood but never needs paint |
| Insulation Value | Low (blocks sun but does not stop radiant heat) | High (keeps the patio area noticeably cooler) | Moderate to High (available in solid insulated styles) |
| Aesthetic Appeal | Clean, modern, utility-focused look | Sleek, finished ceiling appearance | Warm, traditional wood-grain texture and look |
| Best For | Budget-friendly rain and sun protection | Maximum heat reduction and integrated lighting | Premium look matching classic home designs |
If you are looking for creative ways to upgrade your outdoor space on a budget, exploring DIY Patio Cover Solutions: Reinventing Your Outdoor Space (Home Improvement Tips) can spark some great design inspiration. For those focused on keeping project expenses low, we have also compiled some of the best Cheap Patio Roof Ideas to help you get the look you want without breaking the bank.
What is a Patio Overhang?
A diy patio overhang is a structural roof extension that attaches directly to your home’s exterior wall or roofline, extending outward to cover a concrete slab, deck, or patio surface. Unlike freestanding gazebos, an attached overhang relies on your house’s existing framing for structural support on one side, while heavy-duty aluminum posts support the outer edge.
Whether you prefer a simple utility cover or an insulated system, the key to a successful build is structural integrity. If you want a straightforward introduction to these structures, take a look at our guide on building a Simple DIY Patio Cover to see how manageable the process can be.
Cost and Time Investment
Building your own patio cover is highly cost-effective. While a professional installation typically averages around $5,000, a high-quality DIY aluminum kit generally costs between $1,500 and $3,000. This saves you thousands in labor costs while still delivering a professional-grade result.
In terms of time, expect to spend about 20 to 40 hours on the build. For a couple of moderately experienced DIYers, this translates to a rewarding weekend project. If you are planning to expand your outdoor footprint during this project, our Cheap Patio Extension Ideas Guide offers excellent strategies for maximizing your space efficiently.
Planning Your DIY Patio Overhang: Design, Permits, and Calculations
A successful build starts long before you cut your first piece of aluminum. Proper planning prevents structural sagging, water leaks, and issues with local building inspectors.
First, perform a thorough site assessment. Measure the height of your home’s ledger attachment point (usually just below the roof fascia or eave) and ensure you have enough clearance. You want a minimum clearance of 6 feet, 8 inches at the lowest point of the overhang to keep the space feeling open and comfortable.
Next, you must account for local building codes and snow loads. Along the Wasatch Front and throughout Utah, building codes are strict because of our winter weather. Outdoor structures in our region must typically be engineered to handle 20 to 40 pounds per square foot (psf) of live load (snow and rain) plus an additional 10 psf of dead load (the weight of the structure itself).
If you are designing for areas prone to heavy moisture, reading up on Designing a Functional Patio Overhang for Wet Weather (Practical Solutions) will help you calculate the ideal pitch and drainage system. To make the planning phase even easier, we offer free DIY Instruction Guides that outline structural specifications and local engineering requirements.
Choosing the Right Materials for Your DIY Patio Overhang
When building a structure designed to last for decades, material choice is everything. While untreated wood exposed to UV light darkens 20% to 30% faster than treated materials, and requires constant sanding, staining, and sealing to prevent rot, high-grade aluminum and Alumawood offer a smarter alternative.
Alumawood is engineered from heavy-duty, wood-grained aluminum. It gives you the gorgeous, warm aesthetic of natural wood but is completely resistant to rot, peeling, warping, and termites. If you want a deep dive into choosing the right materials, our DIY Patio Cover Kits Complete Guide covers everything you need to know about selecting solid, insulated, or lattice aluminum systems.
Essential Tools and Safety Equipment
You do not need to be a master craftsman to build an aluminum patio cover, but you do need the right tools. Before starting, make sure you have the following on hand:
- Drill and impact driver (with high-quality hex head drivers)
- Laser level or high-precision spirit level
- Chalk line for marking long, straight ledger lines
- Miter saw equipped with a non-ferrous metal cutting blade (to cut aluminum cleanly)
- Post-hole digger (if anchoring posts in ground footings)
- Safety glasses, heavy-duty work gloves, and fall protection if working on ladders
Having the proper setup ensures your cuts are precise and your assembly goes smoothly. For more tool tips and kit customization options, check out our DIY Options page.
How to Build Your Custom Patio Cover
Now that your tools are prepped, your permits are approved, and your materials have arrived, it is time to start building.

Properly attaching the overhang to your home’s existing structure is the most critical part of the entire build. The ledger board (or receiver channel in aluminum kits) must be anchored directly into the house’s structural framing—never just into siding or stucco. If you have vinyl or wood siding, you must cut back a section of the siding or install specialized mounting brackets to ensure a flush, secure connection to the wall studs or rim joist.
Once the ledger is bolted down with heavy-duty lag screws, apply continuous metal flashing and high-grade silicone sealant along the top edge. This creates a waterproof barrier that prevents rain and melting snow from seeping behind the ledger and causing dry rot in your home’s walls. For creative ideas on how to seamlessly integrate a cover with your home’s architecture, browse our Patio Cover Ideas Ultimate Guide.
Step-by-Step Construction of Your DIY Patio Overhang
Follow these steps to construct your aluminum patio cover:
- Set the Support Posts: Dig footing holes at least 3 feet deep (or below your local frost line) and 12 inches in diameter. Pour concrete and set heavy-duty galvanized post anchors. Once the concrete cures, bolt your aluminum support posts to the anchors, ensuring they are perfectly plumb.
- Attach the Header Beam: Lift the aluminum header beam onto the support posts. Secure it using the specialized brackets and self-drilling fasteners provided in your kit. Check that the beam is completely level across the front of the patio.
- Install the Ledger Receiver: Secure the aluminum receiver channel to your house wall at your pre-marked height, ensuring it is level and sealed with flashing.
- Install the Roof Panels: Interlocking aluminum panels snap together easily. Start at one end of the structure, inserting the panel into the ledger receiver and resting the outer end on the header beam. Secure the panels to both the ledger and header beam using the manufacturer-specified fasteners.
- Install the Gutters and Downspouts: Attach the integrated gutter system to the front edge of the panels. Run downspouts down the support posts to direct water safely away from your patio slab and home foundation.
For visual aids and detailed schematic drawings of this installation process, you can download our DIY Instruction Guides or review our comprehensive DIY Patio Cover Kits Utah Guide 2026.
Common Mistakes and Maintenance Tips
The most common mistake DIYers make is failing to establish an adequate roof pitch. A flat roof will pond water, accelerating leaks and structural strain. We recommend a minimum slope of 3:12 (a 3-inch drop for every 12 feet of run) to ensure proper water and snow runoff.
Another frequent error is skipping the sealant on fastener heads. Always apply a generous dab of outdoor-grade silicone over every exposed screw head on the roof panels.
Fortunately, maintaining an aluminum or Alumawood patio cover is incredibly simple. Unlike wood, which requires annual sanding and staining, your aluminum cover only needs an annual debris clearing from the gutters and a quick wash with a garden hose and mild soap to keep it looking brand new. For more long-term care tips and design inspiration, visit our Patio Cover Ideas page.
Frequently Asked Questions About DIY Patio Overhangs
Do I need a permit to build a DIY patio overhang?
Yes. In almost all Utah municipalities—including Salt Lake City, Sandy, Layton, and Orem—any structural addition attached to your home requires a building permit. When you purchase an engineered aluminum patio cover kit from us, we provide the necessary engineering plans and structural calculations required by your local building department, making the permit application process simple and stress-free.
How do I prevent my patio overhang from leaking?
Preventing leaks comes down to three things: a proper 3:12 roof slope, high-quality ledger flashing, and sealing all interlocking panel joints with premium silicone sealant during assembly. Ensuring that water flows smoothly into your gutter system rather than pooling on the roof is the absolute best way to keep your patio dry.
Is it cheaper to build a DIY patio overhang or hire a professional?
Building it yourself will save you roughly 40% to 50% on the total cost of the project by eliminating professional labor fees. However, you must factor in your own time, physical effort, and comfort working on ladders. If you are debating whether to tackle the structural patio cover project yourself or hire our experienced crew, read our detailed comparison on DIY Awning Installation vs Hiring a Pro in Utah.
Conclusion
Building a DIY patio overhang is a fantastic way to reclaim your backyard, protect your outdoor furniture, and keep your home cooler during hot Utah summers. By choosing a high-quality aluminum or Alumawood kit, you get a beautiful, durable structure that will never rot, warp, or require tedious painting.
While building a patio cover is a highly rewarding weekend project for hands-on homeowners, we understand that not everyone has the time or desire to spend their weekend on a ladder. If you would prefer to sit back and let the professionals handle the heavy lifting, we are here to help. At Awnings Unlimited, our family-owned team has been installing premium, custom-engineered patio covers across the Wasatch Front for over 50 years.
Ready to transform your outdoor living space? Get a custom patio cover quote from Awnings Unlimited today, and let us help you build the perfect shade solution for your home!