

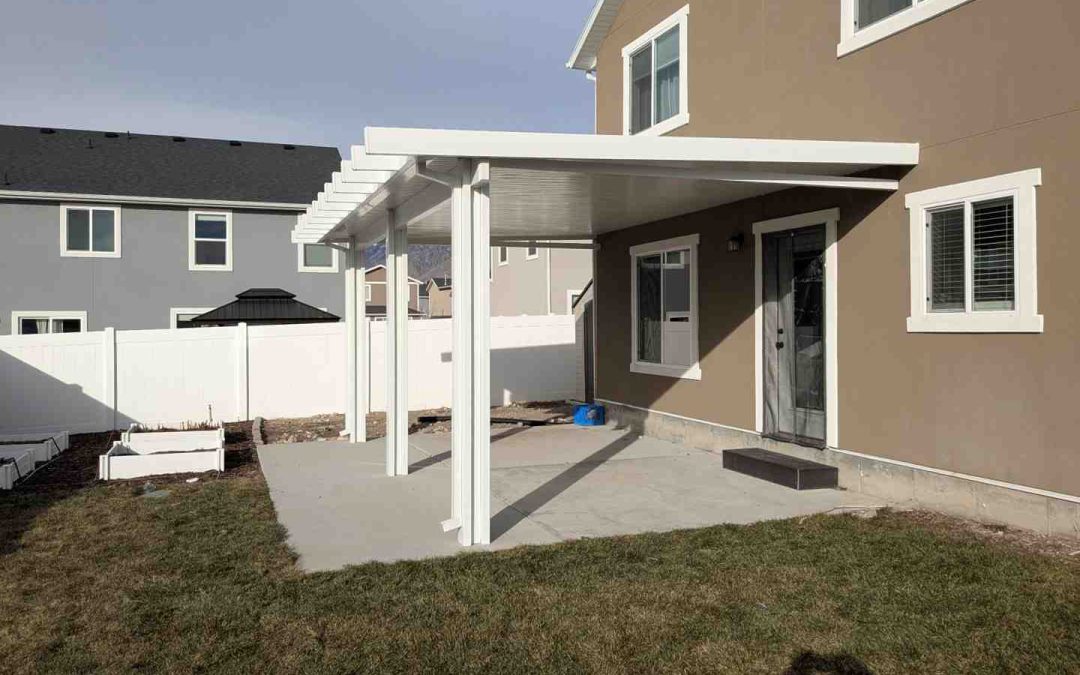
What You Need to Know About Alumawood Patio Cover Installation
Alumawood patio cover installation is a structured process that involves planning, permits, site prep, and assembly — and when done right, it creates a durable outdoor shade structure that can last 20 to 30 years.
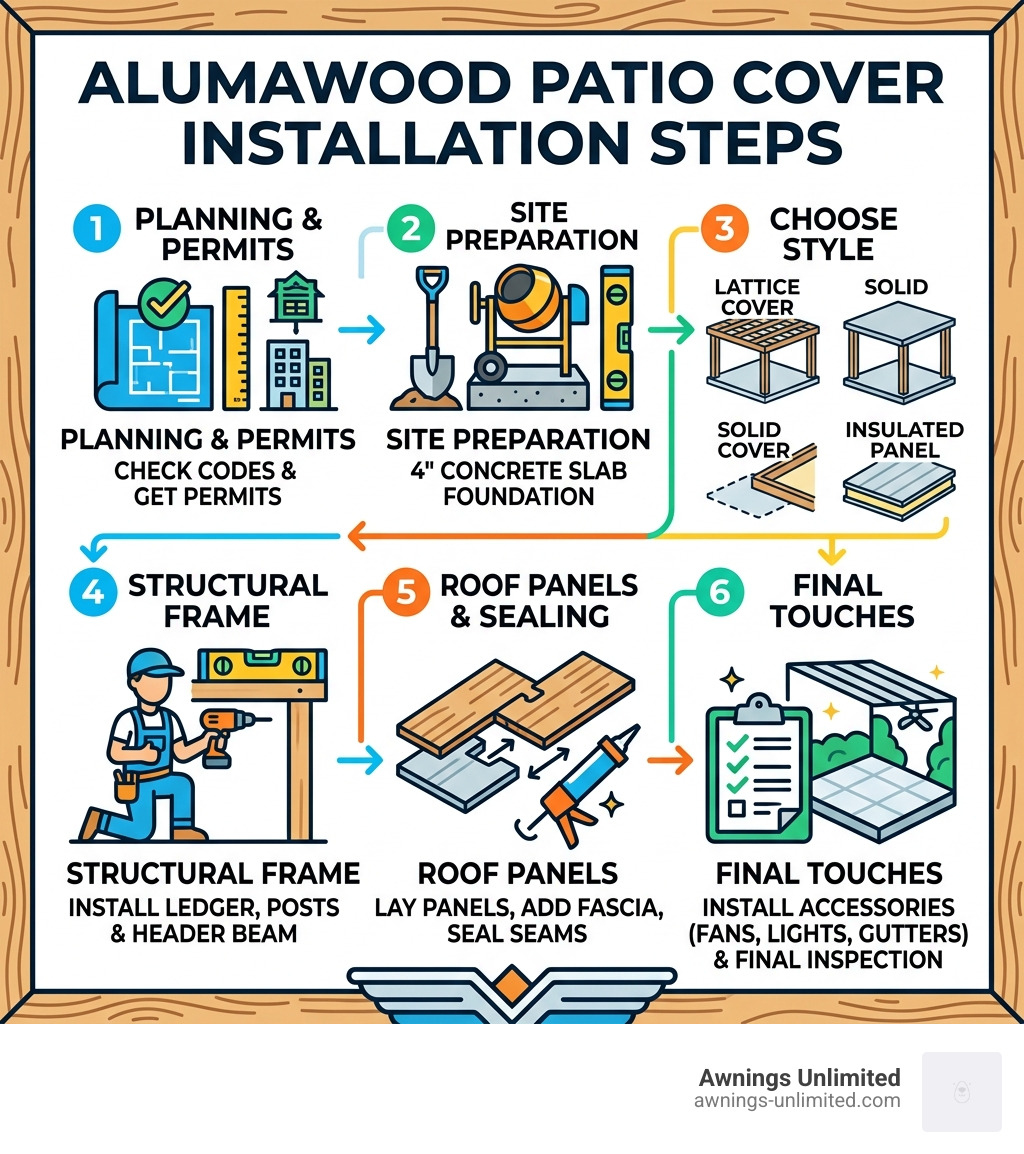
Here’s a quick overview of what the process involves:
- Plan and measure your space, check local building codes, and secure permits
- Prepare the foundation — a minimum 4-inch concrete slab is required
- Choose your cover style — lattice, solid, or insulated panels
- Install the ledger, posts, and header beam using self-tapping screws and a level
- Lay interlocking roof panels, add fascia trim, and seal all seams with flashing and caulk
- Add accessories like fans, lights, or gutters as needed
- Inspect and clean annually to keep it looking new
Most standard installations take 1 to 2 days once materials are on-site and permits are approved.
Alumawood is made from 100% aluminum but engineered to look like real wood. It has an embossed woodgrain surface, resists rust, rot, termites, and warping, and never needs painting. The proprietary Aluma-Shield® finish — bonded with Teflon® — repels dirt, oil, and UV damage for decades of low-maintenance performance.
It’s one of the most popular patio cover materials in the country right now, and for good reason. You get the warmth and look of wood without any of the weekend maintenance headaches.
But here’s the thing: a lot of homeowners underestimate what’s involved. Permitting, structural squareness, proper flashing, and foundation requirements can all trip up even a handy DIYer — and a mistake early in the process can mean leaks, instability, or a failed inspection down the road.
At Awnings Unlimited, we’ve been installing Alumawood patio covers across Northern Utah since 1976, and we’ve seen every common mistake in the book. In this guide, we’ll walk you through everything — from planning and permits to step-by-step Alumawood patio cover installation — so you can make the smartest decision for your home.
Planning Your Alumawood Patio Cover Installation

Before you ever pick up a drill, the success of your Alumawood patio cover installation depends on the groundwork you lay during the planning phase. We often see homeowners get excited and order a kit, only to realize they didn’t account for property setbacks or HOA restrictions.
First, you need to determine if you want an attached or freestanding structure. Attached covers use a ledger board secured directly to your home’s wall, while freestanding units stand on their own four (or more) legs. Each requires different engineering. You’ll also need to accurately measure the length, width, and diagonals of your space. Measuring diagonals is a pro tip we always share; it’s the only way to ensure your patio area is perfectly square.
Building Permits and Local Codes
In Utah and Wyoming, building permits are not just a suggestion—they are a legal requirement for permanent structures. Local building departments in cities like Salt Lake City, Sandy, or Draper have specific codes regarding wind loads (often 90-130 MPH) and snow loads. In our region, snow loads are a major factor, sometimes requiring 30–60+ pounds per square foot (psf) of structural capacity.
If you are part of a Homeowners Association (HOA), you’ll likely need their approval on the color and style before you begin. For more details on the pre-purchase phase, check out Patio Covers 101: Everything You Need to Know Before You Buy.
Foundation Requirements and Concrete Specifications
One of the most critical “make or break” factors for Alumawood patio cover installation is the foundation. You cannot simply set these posts on dirt or thin pavers.
- Minimum Thickness: A concrete foundation must be at least 4 inches thick.
- Curing Time: If you are pouring a new slab, it typically needs 5 to 7 days to cure before it can support the weight of the structure.
- Structural Footings: In colder climates like Park City or Logan, we often recommend digging footings below the frost line (24–48 inches) to prevent “heaving” during the freeze-thaw cycles of a Utah winter.
- Cost: If you don’t have a slab yet, expect to pay between $6 and $14 per square foot for professional flatwork.
For a deeper dive into regional requirements, see our Patio Covers Utah Guide 2026.
Choosing Your Style: Lattice vs. Solid vs. Insulated
Alumawood isn’t a one-size-fits-all product. Depending on how you use your backyard, you’ll choose one of three main types:
- Laguna Lattice: This provides dappled shade (the “pergola” look) and allows for airflow. It’s beautiful but won’t keep you dry in a rainstorm.
- Newport Solid: These use interlocking “Super 6” flat panels to create a completely watertight roof.
- Insulated Roof Panels (Newport w-Maxx): These are the “Cadillac” of patio covers. They feature a foam core that muffles the sound of rain and keeps the area significantly cooler during those 100-degree July days in St. George or Salt Lake.
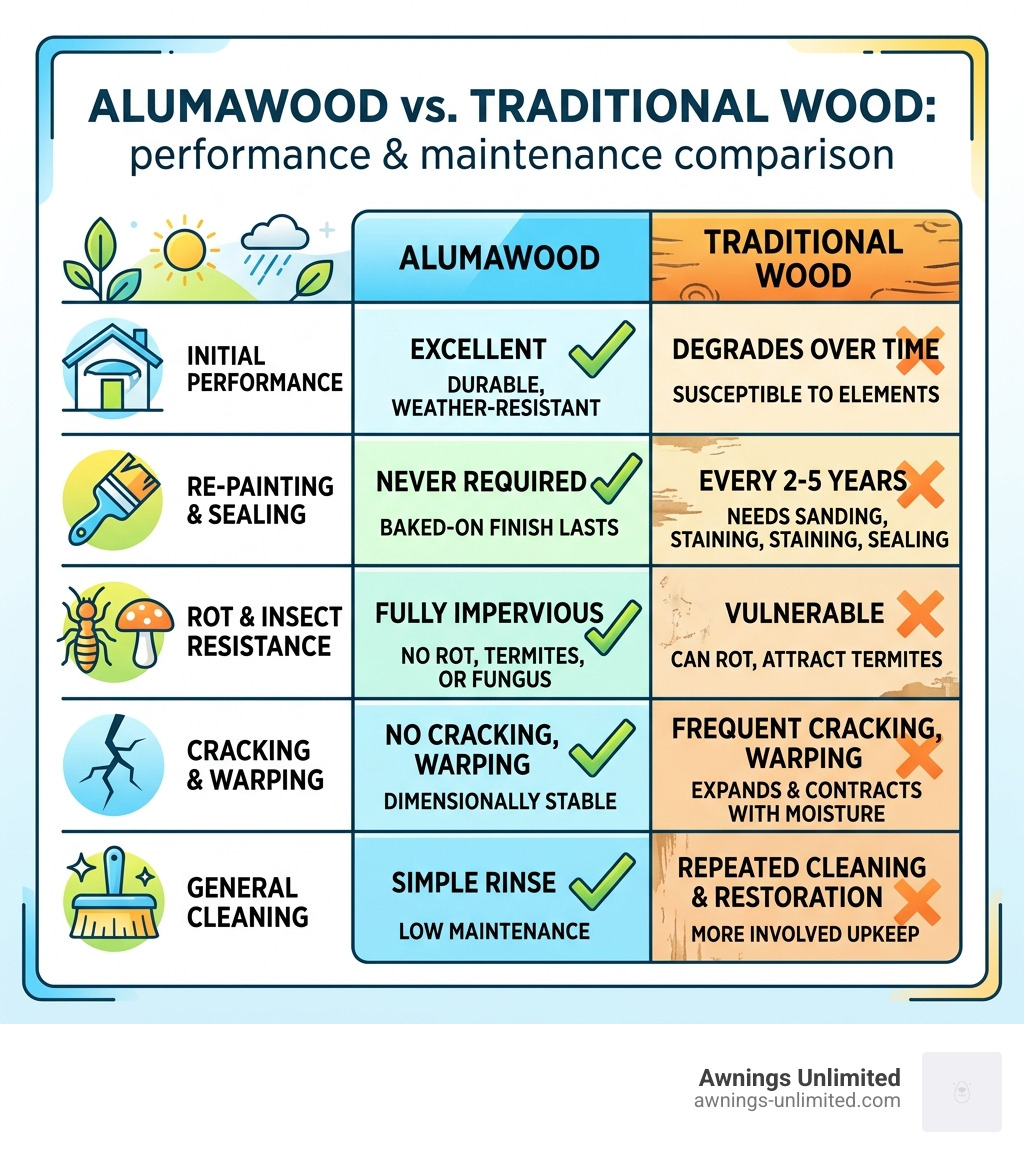
As you can see, Alumawood Patio Covers offer a massive advantage over wood, which requires sanding and staining every few years just to prevent rot.
Master the Alumawood Patio Cover Installation Process

If you’ve decided to tackle the Alumawood patio cover installation yourself, you’re essentially assembling a high-quality, pre-engineered kit. Because aluminum is lightweight, it’s much easier to handle than heavy timber, but precision is everything.
The process starts with marking your ledger height on the house wall using a chalk line. This ledger must be perfectly level, as every other component relies on this starting point. You can find technical diagrams on the official Alumawood instructions page.
Essential Tools for Alumawood Patio Cover Installation
Don’t start this project with just a screwdriver and a prayer. You’ll need:
- Power Drill & Impact Driver: For driving self-tapping screws.
- Magnetic Hex Head Drivers: Essential for holding those screws while you’re on a ladder.
- Miter Saw: With a fine-tooth blade specifically for cutting aluminum.
- Rotary Hammer Drill: To sink anchors into your concrete foundation.
- Levels: A 4-foot and an 8-foot level are best.
- Safety Gear: Safety glasses are non-negotiable when cutting metal, as tiny shards can fly.
For more on why the right equipment matters, read about Aluminium Patio Covers: The Ultimate Solution for Outdoor Living.
Step-by-Step Alumawood Patio Cover Installation Guide
Once your site is prepped and your tools are ready, follow these general steps (always refer to your specific kit’s manual for exact measurements):
- Mount the Ledger: Secure the ledger board to the house studs. Ensure you use proper flashing to prevent water from getting behind your siding.
- Set the Posts: Mark your post locations on the concrete. Use a hammer drill to set your anchors and AlumaBase covers.
- Install the Header Beam: This beam runs across the tops of your posts. It’s the “spine” of the structure.
- Install Rafters or Roof Panels: For a solid cover, these panels interlock. Start from one side and work across, ensuring each panel clicks into place.
- Fascia and Trim: Attach the decorative perimeter pieces that give the cover its finished, wood-like look.
- Seal Everything: Use high-quality outdoor sealant on all seams and where the cover meets the house. This is the most common place where DIYers fail, leading to leaks later.
For a more comprehensive walkthrough, see our Patio Cover Builders Complete Guide.
Avoiding Common DIY Installation Pitfalls
We often get calls from homeowners halfway through a Alumawood patio cover installation who have hit a wall. Here are the most common mistakes we see:
- Out of Square: If your foundation isn’t square or your ledger is slightly tilted, the roof panels won’t line up. By the time you get to the last panel, you might have a 2-inch gap that’s impossible to close.
- Improper Flashing: Water is the enemy of your home’s structure. If you don’t install flashing correctly at the ledger, water will seep into your wall, leading to mold and rot inside your house.
- Underestimating Wind/Snow Loads: Using the wrong fasteners or skipping a support post might look fine in the summer, but a heavy Utah snowstorm can cause a structural failure.
- Skipping the Permit: If you build without a permit, you may be forced to tear the structure down when you try to sell your home, or worse, if a neighbor reports the work.
This is why many choose Professional Patio Cover Installation. We handle the engineering, the city red tape, and the heavy lifting, ensuring it’s done right the first time. Plus, a professional install protects your warranty. You can learn more about the long-term savings in our article, In with Alumawood, Out with Maintenance Costs for Good.
Customizing and Maintaining Your Outdoor Space
One of the best parts of an Alumawood patio cover installation is the ability to customize. You aren’t just building a roof; you’re building an outdoor room.
- Mega Beam Technology: If you want a ceiling fan, you need a Mega Beam. This reinforced internal beam allows you to mount a fan securely without the cover vibrating or sagging.
- Lighting: We can integrate UL-approved junction boxes for recessed LED lights, making your patio usable long after the sun goes down.
- AlumaBase: These decorative covers hide the ugly steel anchors and bolts at the bottom of your posts, giving a seamless, high-end look.
- AlumaTable: A clever accessory that wraps around your patio post to provide a convenient surface for drinks or snacks without taking up floor space.
Maintenance is remarkably simple. Unlike wood, which requires a weekend of labor every year, Alumawood just needs a quick rinse with a garden hose once or twice a year. For stubborn dust, a mild soap like Dawn works wonders. We recommend using AlumaShine cleaner to maintain that factory-fresh glow.
For more inspiration on how to design your space, check out Our Guide to Choosing the Perfect Patio Cover for Your Home.
Frequently Asked Questions about Alumawood Setup
How long does a typical installation take?
For a professional crew, a standard Alumawood patio cover installation takes just 1 to 2 days. For a DIYer, we usually suggest budgeting two full weekends—one for site prep and foundation work, and one for the actual assembly. Factors like size, the complexity of the attachment, and whether you’re adding electrical features will affect the timeline.
Can I install a ceiling fan on an Alumawood cover?
Yes, but you must plan for it during the design phase! You cannot simply screw a fan into a standard aluminum panel. You need a “Fan Beam” or “Mega Beam” to support the weight and the torque of the motor. You should also ensure you’re using a UL-approved outdoor junction box to keep the electrical connections safe from moisture.
How long will an Alumawood patio cover last?
An Alumawood cover is designed to last 20 to 30 years—and often longer with minimal care. Because it is 100% aluminum, it cannot rust. The Aluma-Shield finish is baked on at the factory, meaning it won’t peel or flake like paint on wood. This durability is a major reason people choose it when Unpacking Pergola Costs and Material Choices.
Conclusion
At the end of the day, an Alumawood patio cover installation is an investment in your home’s value and your family’s quality of life. While a DIY approach can be tempting for the handy homeowner, the complexities of Utah building codes, snow load requirements, and the precision needed for a watertight finish make professional installation a smart choice.
At Awnings Unlimited, we’ve been the trusted name in outdoor shade across the Wasatch Front since 1976. From Salt Lake City to Park City and everywhere in between, our family-owned business is dedicated to providing durable, beautiful, and professionally installed patio covers that stand the test of time.
Ready to transform your backyard into a shaded oasis without the DIY stress? Start your project with Awnings Unlimited today and let us handle the heavy lifting!