

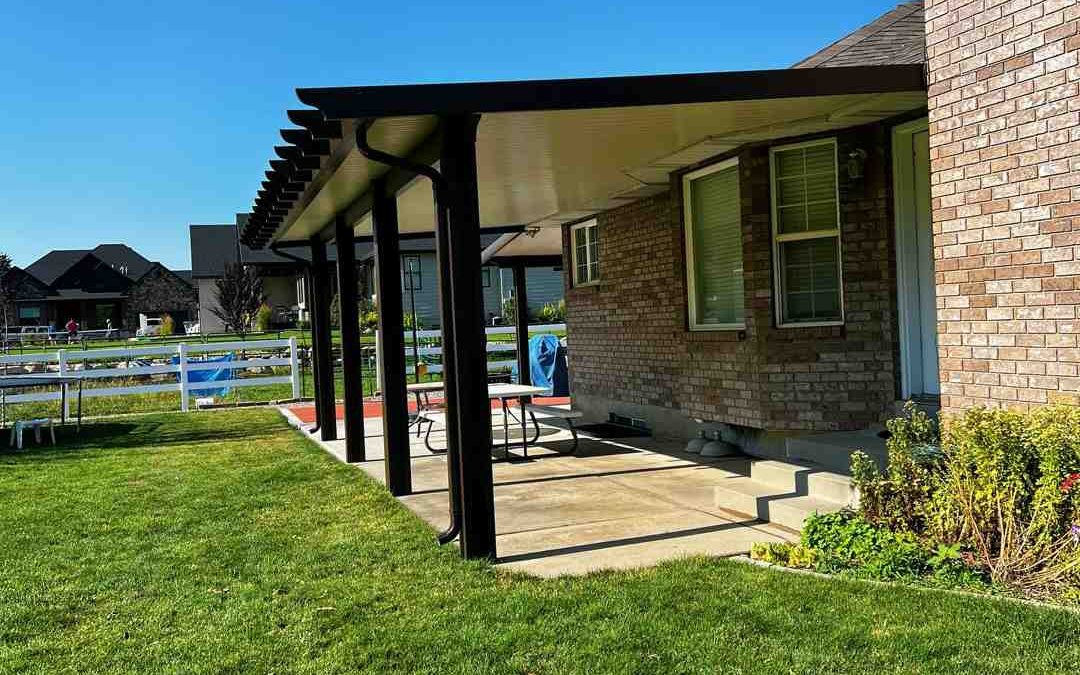
Aluminum Patio Installation: What Every Utah Homeowner Should Know First
Aluminum patio installation is one of the most rewarding weekend projects a homeowner can take on — and one of the easiest to get wrong without the right prep.
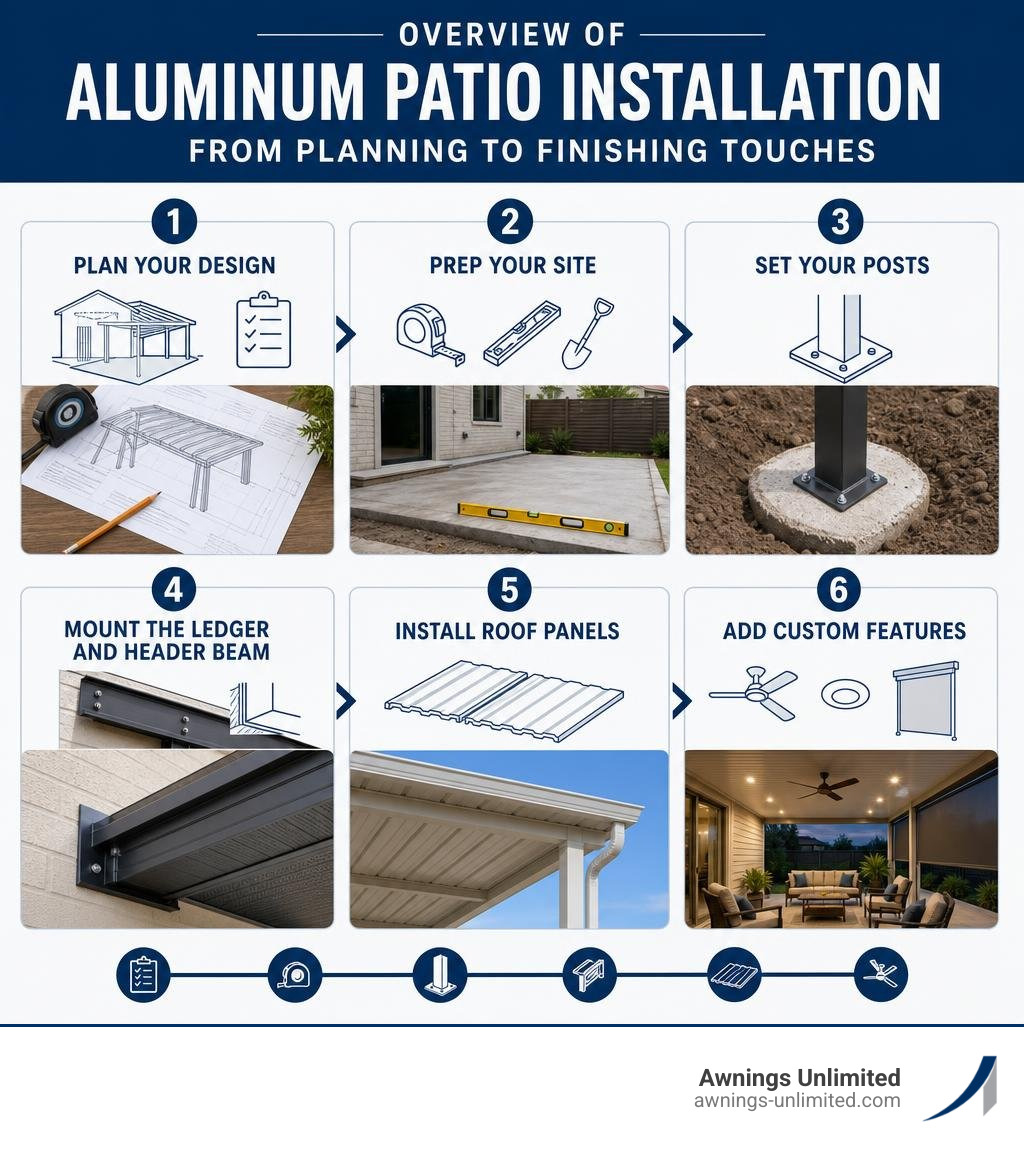
Here’s a quick overview of what the process involves:
- Plan your design — Choose attached or freestanding, pick your panel type, check permits and HOA rules
- Prep your site — Measure, square, level, and gather tools and materials
- Set your posts — Anchor support posts into concrete, pavers, or an existing deck
- Mount the ledger and header beam — Attach securely to wall studs with proper flashing
- Install roof panels — Interlock panels, seal seams, and add gutters
- Add custom features — Lighting, ceiling fans, or screens to finish the space
A typical DIY installation takes about two full days for a straightforward rectangular design — though first-timers should plan for three to four weekends, especially when factoring in permit wait times and concrete curing.
The good news? Modern Alumawood kits come with pre-cut components and self-tapping screws that make the process far more manageable than building from scratch.
At Awnings Unlimited, we’ve been helping Utah homeowners with aluminum patio installation since 1976 — nearly five decades of hands-on experience serving the Wasatch Front with custom Alumawood patio covers built to handle Utah’s intense sun, wind, and heavy winter snow loads. Whether you’re planning a DIY project or want a professional crew to handle it, this guide walks you through every step.
Planning Your Aluminum Patio Cover: Design, Permits, and Costs
Before you pick up a drill or order an Alumawood kit, you need a solid plan. The first major design choice you will make is selecting between an attached design and a freestanding design.
An attached patio cover links directly to your home’s existing structural framing using a ledger board. This design provides seamless transition from your indoor living space to your outdoor oasis, utilizes your home for structural stability, and typically requires fewer support posts.
A freestanding cover, on the other hand, stands completely on its own footprint. This option is ideal if you want to shade a poolside seating area or a spot further out in your backyard, or if your home’s roofline or siding makes mounting a ledger board overly complex.
Navigating Building Permits and Local Codes in Utah
Because we are in July 2026, local building departments along the Wasatch Front—from Salt Lake City and Sandy to Draper and Park City—have strict guidelines regarding accessory structures. You will almost certainly need a building permit if your cover is attached to your home or if a freestanding structure exceeds 120 square feet.
When submitting your plans to your city planning department, you must account for:
- Setback Rules: How close your structure can sit to your property lines.
- HOA Approvals: Many residential developments in Northern Utah (such as those in Saratoga Springs, Eagle Mountain, or Draper) require pre-approval for any exterior modifications.
- Snow Load Requirements: This is critical in Utah. While valley locations like West Jordan or Orem might only require a 30 pounds per square foot (psf) snow load rating, mountain communities like Park City or Heber City can require 60 to 100+ psf ratings. Standard aluminum patio kits are typically engineered to handle snow loads of up to 40 psf, so you must verify your local requirements first.
- Wind Load Ratings: Our canyon winds can be brutal. Your structure must be engineered to withstand wind speeds of 90 to 115+ mph.
Understanding the Financials
How much does a patio cover cost? A DIY aluminum patio cover kit typically ranges from $1,500 to $5,500 for materials alone, depending on the size and design. If you choose professional installation, the total cost generally ranges from $3,000 to $20,000+, depending on customization, size, and foundation requirements.
While wood-frame structures might seem appealing initially, they require constant staining, painting, and sealing to prevent rotting and warping. An Alumawood Patio Cover offers a limited lifetime manufacturer’s warranty, completely eliminating the long-term maintenance costs associated with wood.
| Feature / Option | Solid Alumawood | Lattice Alumawood | Insulated Alumawood |
|---|---|---|---|
| Average Material Cost | Budget-Friendly ($1,500 – $3,500) | Mid-Range ($2,000 – $4,500) | Premium ($3,500 – $6,000+) |
| Shade Density | 100% Full Shade | 40% – 60% Dappled Shade | 100% Full Shade + Thermal Barrier |
| Weather Protection | Full Rain/Snow Protection | None (Open Slat Airflow) | Full Protection + Heavy Snow Load |
| Durability | 20 – 30+ Years (No Rust/Rot) | 20 – 30+ Years (No Warp/Peel) | 50+ Years (High Structural Grade) |
| Maintenance | Occasional Soap & Water Wash | Occasional Soap & Water Wash | Virtually Maintenance-Free |
Choosing Between Insulated and Non-Insulated Roof Panels
If you decide on a solid roof style, you must choose between insulated and non-insulated panels.
Non-insulated panels (often called flat pan or V-pan covers) are lightweight, highly economical, and provide excellent rain and snow protection. However, because metal conducts heat, the space beneath a non-insulated panel can feel warm on a scorching July afternoon.
Insulated panels feature a dense foam core sandwiched between two sheets of high-grade aluminum. This foam core acts as a highly effective thermal barrier, reflecting radiant heat away from your patio.
An insulated roof can lower the temperature under your cover by up to 15 degrees compared to a non-insulated cover. Additionally, insulated panels are strong enough to walk on (making roof maintenance easier) and feature internal utility channels designed to safely run electrical wiring for ceiling fans and light fixtures.
Choosing the right panel type is the first step toward creating your dream outdoor space; you can read more about how these modern materials transform backyards in our guide on Aluminium Patio Covers: The Ultimate Solution for Outdoor Living.
Pre-Installation Prep: Tools, Materials, and Measurements
Before beginning your aluminum patio installation, you must gather the right tools. Because aluminum components are pre-finished, using the wrong tools can scratch the paint or damage the metal.
The Essential DIY Tool Checklist
- Power Drill & Impact Driver
- 5/16-inch Hex Head Drill Bit (for self-tapping screws)
- 2-inch Hole Saw (for downspout installation)
- Hammer Drill & 3/8-inch Masonry Bit (for concrete anchoring)
- Laser Level or 4-foot Bubble Level
- Chalk Line & Tape Measure
- Miter Saw with a Non-Ferrous Metal Cutting Blade (for clean cuts on aluminum)
- Silicone Caulking Gun
- Safety Gear (gloves, safety glasses, and ear protection)
Understanding Your Materials
High-quality aluminum patio kits use specific grades of metal for different structural roles. Load-bearing components like support posts and header beams are crafted from 6061-T6 structural aluminum, which is the strongest common alloy available. Non-structural elements, such as rafters, gutters, and decorative trim, typically use 6063-T5 aluminum, which is easier to shape and finish.
When fastening these components, always use stainless steel fasteners. Never use standard galvanized steel screws.
When dissimilar metals like zinc-coated galvanized steel and aluminum come into contact in the presence of moisture, a chemical reaction known as galvanic corrosion occurs. This reaction rapidly degrades the aluminum, compromising your structure’s safety. Stainless steel fasteners prevent this reaction entirely.
Preparing Your Site for Aluminum Patio Installation
An uneven foundation is the number one cause of failed DIY installations. If your starting surface isn’t level, your posts will be crooked, your roof panels won’t interlock correctly, and water will pool instead of draining.
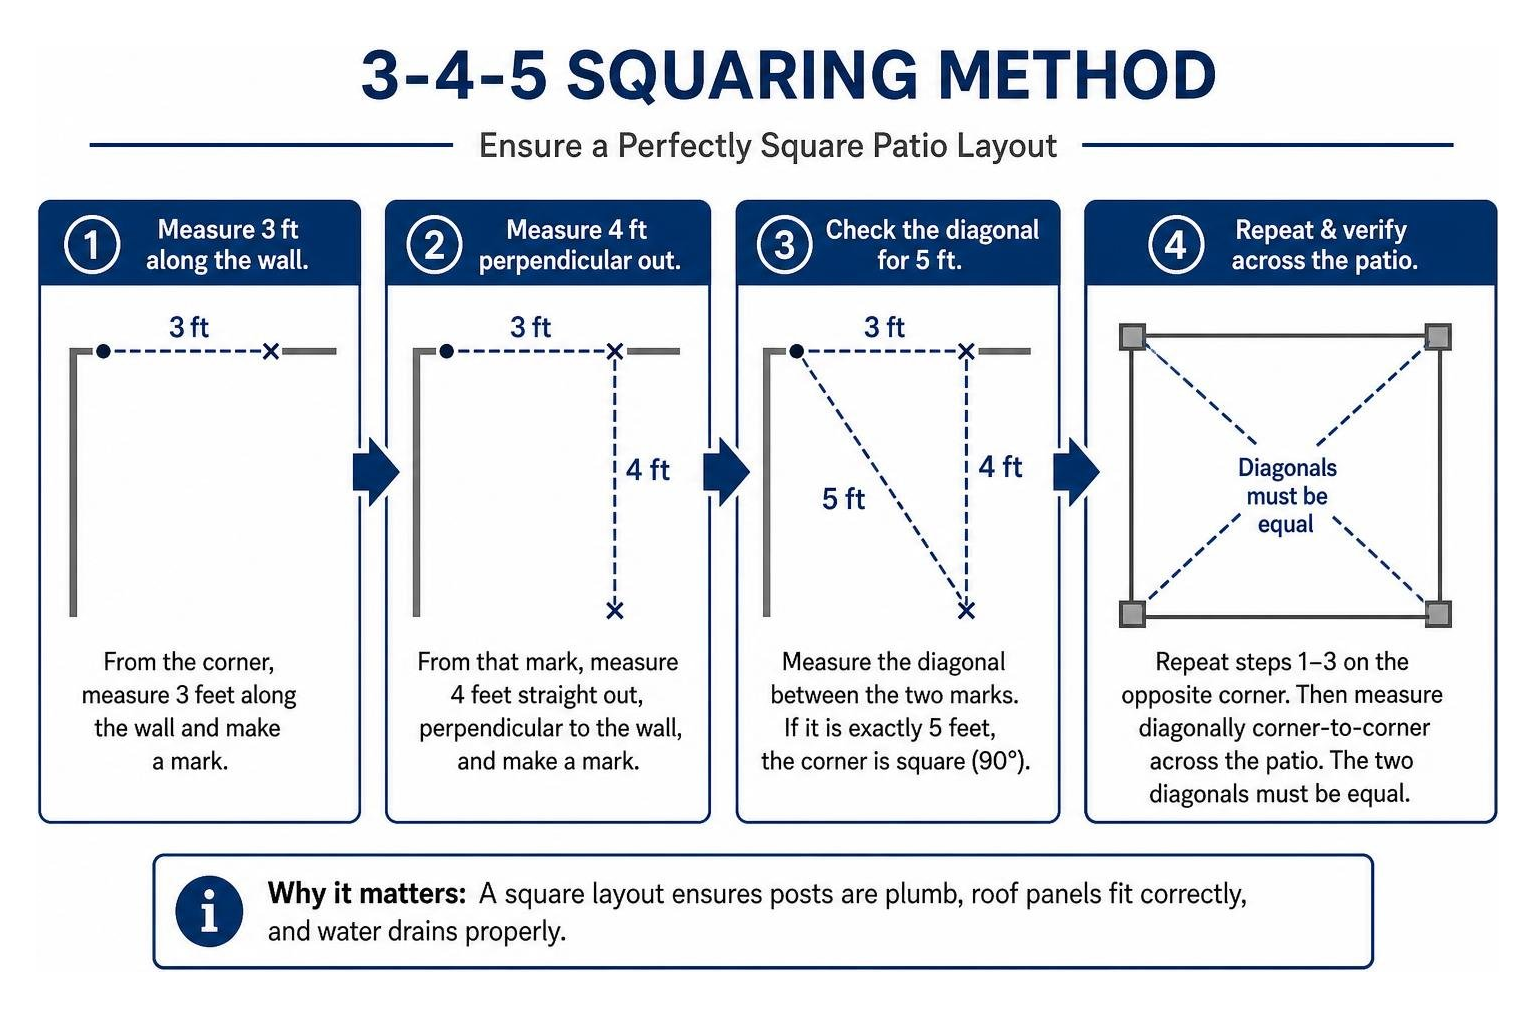
First, verify that your patio space is perfectly square using the 3-4-5 squaring method:
- Measure exactly 3 feet along your home’s wall from a corner and make a mark.
- Measure exactly 4 feet straight out, perpendicular to the wall, and make a mark.
- Measure the diagonal distance between the two marks. If it is exactly 5 feet, your corner is perfectly square (90 degrees).
- Repeat this process on the opposite corner, and verify by measuring diagonally from corner to corner across the entire patio footprint. The two diagonal measurements must be equal.
Next, clear all debris, trim back overhanging tree branches, and check the level of your ground. Your patio slab or deck should have a slight slope away from your house to prevent water pooling near your foundation.
For your patio cover’s roof, you must establish a drainage slope of at least 1/2 inch of drop for every foot of projection away from the house. For example, if your cover projects 12 feet out, the front header beam must sit 6 inches lower than the wall-mounted ledger board.
Step-by-Step Guide to Aluminum Patio Installation
Once your site is prepped and your tools are laid out, it is time to begin the physical installation. Remember to place all aluminum components on a clean tarp during assembly to prevent scratching the baked-on paint finish.
Step 1: Setting and Securing Support Posts
Your support posts bear the weight of the entire structure, as well as winter snow loads. How you secure them depends entirely on your ground surface:
- Concrete Slab: If mounting to an existing concrete patio, your slab must be at least 4 inches thick. Mark your post locations, ensuring they are placed at least 4 inches away from the slab edge and 30 inches away from any visible cracks. Drill holes using a hammer drill and 3/8-inch masonry bit, blow out the concrete dust, and secure heavy-duty steel expansion anchors through the post brackets.
- Paver Patio: Never anchor support posts directly to paving stones; pavers will shift under wind and snow loads. Instead, remove the pavers at your post locations, dig post holes to your local frost depth (typically 2 to 3 feet deep in Utah), pour concrete footings, and let them cure for at least 48 hours before mounting your post brackets.
- Wood Deck: If mounting to a deck, you must anchor your posts directly to the underlying joists. Never screw post brackets into deck boards alone. Add solid wood blocking beneath the deck boards if necessary, and secure the brackets using heavy-duty structural lag screws.
Once your brackets are secure, slide your aluminum post sleeves over the internal steel supports (if your kit includes them). Use a 4-foot level to ensure each post is perfectly plumb in both directions before securing them to the brackets.
Step 2: Mounting the Ledger Board and Header Beam
The ledger board connects your patio cover to your home’s structural framing.
First, locate your home’s wall studs or rim joist. On standard residential builds, studs are spaced 16 inches on center. If your home has stucco siding, find the studs by drilling tiny pilot holes along your layout line with a small masonry bit—these small holes are easily sealed with silicone afterward.
Once located, snap a level chalk line to mark the bottom of your ledger. Apply a generous bead of high-quality silicone caulk to the back of your Alumawood ledger board to create a watertight seal against the wall. Fasten the ledger directly through your siding into the studs using structural lag screws spaced according to your kit’s engineering documents.
Next, slide L-shaped metal flashing over the top of the ledger board and tuck it up under your home’s siding. This prevents rainwater from slipping behind the ledger and rotting your home’s framing.
Once the ledger is secure, mount your front header beam across your support posts. Double-check that the header beam is level and set at the correct height to establish your 1/2-inch-per-foot drainage slope.
For a deep dive into framing and structural requirements, check out our Aluminum Shade Structures Complete Guide.
Step 3: Installing Roof Panels and Gutters
With your framing in place, you are ready to install your roof panels.
Start on one side of the frame. Lay the first panel down and ensure it is perfectly square to the ledger and header beam. Secure it to the frame using self-tapping screws equipped with neoprene rubber washers.
Note: Tighten these screws until the rubber washer compresses slightly. Do not overtighten them, as this can dimple the aluminum and cause leaks around the screw heads.
Slide the second panel into place, interlocking it with the first. For maximum leak protection, apply a thin line of butyl tape along the interlocking seam before snapping the panels together. Work your way across the roof, checking for squareness every few panels.
Once your panels are secure, install your front gutter system. Use a 2-inch hole saw to cut a drainage hole in the gutter bottom where your downspout will attach.
Insert foam plugs into the gutter ends, seal them thoroughly with UV-rated silicone caulk, and mount the gutter to the front header beam.
For advanced tips on panel alignment and sealing techniques from experienced builders, see this guide on Alum Patio Covers: Tips for DIY Assembly Adventures (Expert Techniques).
Customizations, Maintenance, and Troubleshooting
An aluminum patio cover is highly customizable and requires very little effort to keep looking brand new.

Common Mistakes to Avoid During Aluminum Patio Installation
Even experienced DIYers can make mistakes during a build. Keep these common pitfalls in mind:
- Insufficient Slope: If your roof slope is less than 1/2 inch per foot, water will pool on your panels, eventually degrading the sealant and causing leaks.
- Using Galvanized Fasteners: As mentioned, mixing galvanized steel and aluminum leads to rapid galvanic corrosion. Always use stainless steel.
- Skipping Ledger Flashing: Failing to install flashing above your ledger board allows water to seep behind your siding, causing hidden structural rot.
- Overtightening Screws: Overtightening roof screws crushes the rubber washers, causing them to crack and leak.
- Panel Rattle: If your panels aren’t locked tightly together or if your fasteners are spaced too far apart, your roof will rattle loudly during windy days. Use gutter clips every 6 feet and follow manufacturer spacing guidelines to prevent this.
Adding Custom Features and Long-Term Maintenance
Once your structure is complete, you can customize it to match your lifestyle:
- Ceiling Fans & Lighting: If you installed insulated panels, run electrical wiring through the internal utility channels to add a ceiling fan or ambient LED lighting.
- Gutters & Downspouts: Direct your downspouts to discharge water at least 4 feet away from your home’s foundation.
- Screens & Shades: Add retractable screens or privacy curtains to block late-afternoon sun or keep bugs away.
Maintaining your Alumawood cover is incredibly simple. Unlike wood, which requires sanding and painting every few years, aluminum only needs an occasional wash.
Twice a year, spray your cover down with a garden hose and wipe away any accumulated dirt or pollen using mild soap, water, and a soft-bristled brush. This simple routine will keep your cover looking brand new throughout its 20 to 50+ year lifespan.
To learn more about maximizing your outdoor living space, read our Patio Covers Complete Guide 2026.
DIY vs. Professional Installation: When to Call the Experts
Taking on a DIY patio cover project can save you 30% to 40% on labor costs, but it isn’t for everyone.
Consider the following before deciding:
- Time Commitment: A professional crew can typically complete a standard installation in one to two days. For a solo DIYer, a similar build often takes three to four weekends once you factor in planning, tool shopping, and physical labor.
- Complex Rooflines: If your cover must attach to a home with multiple roof heights, bay windows, stucco siding, or a second-story deck, the installation becomes significantly more complicated.
- Safety Risks: Lifting heavy headers and long roof panels onto ladders is physically demanding and carries inherent safety risks.
- Warranty Protection: DIY installations can sometimes void or limit manufacturer warranties if mistakes are made during assembly. Professional installation ensures your investment is fully backed by both manufacturer and workmanship warranties.
If you are on the fence about tackling this project yourself, read our article on Why Choose Professional Patio Cover Installation or consult our Patio Cover Installers Complete Guide to see if professional help is right for your home.
Frequently Asked Questions about Patio Covers
Do I need a building permit for an aluminum patio cover?
Yes, in almost all Utah communities (including Salt Lake City, Sandy, and Draper), a building permit is required if the patio cover is attached to your home or if a freestanding cover exceeds 120 square feet. Always check with your local city planning department regarding specific setbacks, wind ratings, and snow load requirements before starting.
How long does a DIY aluminum patio cover installation take?
For a first-time installer, a simple rectangular cover typically takes 3 to 4 weekends of work. This timeline includes planning, preparing your foundation, waiting for concrete footings to cure (at least 48 hours), and assembling the framing and roof panels. A professional crew can complete the same project in 1 to 2 days.
Can I hang heavy items like swings or plants from my aluminum patio cover?
Standard aluminum patio covers are lightweight structures designed to support their own weight and local snow loads. They are not engineered to carry hanging loads like porch swings, heavy hanging planters, or trellises. Hanging heavy items from your cover can warp the aluminum panels and compromise structural safety.
Conclusion
Installing a patio cover is one of the best ways to expand your usable living space, shield your outdoor furniture from harsh UV rays, and add lasting value to your home. Whether you choose to tackle the installation yourself over a few weekends or prefer the peace of mind that comes with professional execution, high-quality Alumawood is the ideal material to withstand Utah’s diverse climate.
At Awnings Unlimited, we’ve been helping homeowners across the Wasatch Front and Northern Utah create their perfect outdoor spaces since 1976. As a family-owned business based in Salt Lake City, we specialize in durable, custom-designed Alumawood patio covers and structural awnings built to handle our heavy winter snows and hot summer sun.
If you’re ready to upgrade your backyard with a beautiful, low-maintenance structural shade structure, upgrade your outdoor space with a custom awning with gutter or contact us today for a free, no-pressure consultation!