
 **Metal awning installation** is a smart, lasting way to add shade, weather protection, and curb appeal to your home or business. Here's a quick overview of how the process works: 1. **Plan your space** - measure the area, check local building codes, and confirm your mounting surface is structurally sound 2. **Choose your awning** - select the right size, style, and material (aluminum and Alumawood are top choices for durability) 3. **Gather tools and materials** - drill, level, lag bolts, masonry anchors, sealant, and safety gear 4. **Install the frame** - secure the wall hanger, assemble fascias, and set support posts 5. **Attach the panels** - interlock metal panels from left to right, lock into place 6. **Seal and finish** - caulk all joints, install gutters and downspouts, do a final stability check Metal awnings are built to last, holding up against heavy snow, wind, and intense sun - making them especially valuable in climates with extreme seasonal weather. They also add real, lasting value to your property. Whether you're covering a patio or a large structural outdoor space, the installation process follows a clear set of steps. But getting it right matters - the wrong pitch, missed studs, or poor sealing can cause big problems down the road. At **Awnings Unlimited**, we've been handling professional metal awning installation across Northern Utah since 1976, using durable, eco-friendly materials like Alumawood by Amerimax to deliver custom results built for harsh Utah winters and hot summers. In this guide, we'll walk you through everything you need to know - from planning and prep to final finishing touches. 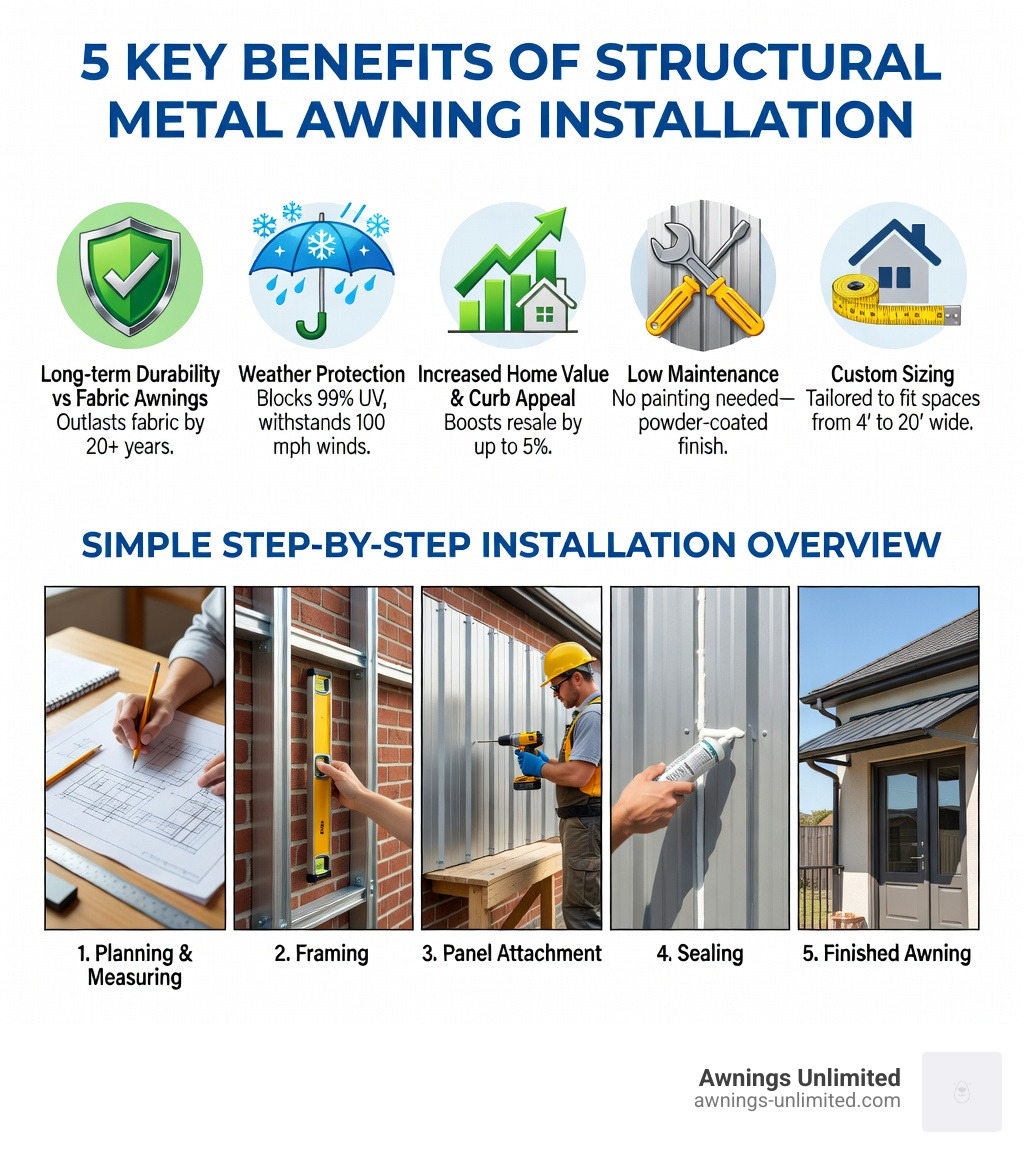 ## Planning and Preparation for Metal Awning Installation Before you pick up a drill, you need a solid plan. A successful **metal awning installation** starts with a thorough site assessment. In our experience working across the Wasatch Front, from Salt Lake City to Ogden, we’ve seen how the local environment dictates the best approach. First, consider the sun angle. If your goal is to cool your home, you’ll want to ensure the awning projection is deep enough to block the high summer sun while allowing for a bit of warmth in the winter. Next, evaluate your drainage flow. Where will the water go during a heavy downpour? You don't want a waterfall landing right on your back doorstep. Structural integrity is the most critical part of the prep phase. You must confirm that the mounting surface—whether it’s brick, siding, or stucco—can support the weight and the wind load of a structural metal cover. This is especially true for [carport installation](https://awnings-unlimited.com/carport-installation-everything-you-need-to-know-before-you-start/), where the spans are often much larger. Finally, don't forget the legal side. Building codes and permit requirements vary between Utah and Wyoming. Most cities in Northern Utah, like Sandy or Draper, have specific regulations regarding how far a structure can extend toward a property line. Always check with your local building department or refer to the [International Code Council](https://www.iccsafe.org/) for general structural guidelines before starting, or hire a [professional awning installation service](https://awnings-unlimited.com/tag/professional-awning-installation/) to handle the red tape for you.  ### Choosing the Right Size and Style When selecting your awning, you need to balance function with fashion. The "width" refers to how far the awning runs along the wall, while the "projection" is how far it sticks out into the yard. For a classic, high-end look, many of our clients in Park City and Heber City choose Alumawood. It offers the beauty of real wood with the lifetime durability of aluminum. You can choose between standing seam styles for a modern industrial look or interlocking aluminum panels for a clean, seamless finish. Color matching is also vital; we recommend choosing a shade that complements your home’s trim or fascia for a cohesive architectural style. ### Measuring Your Space for Metal Awning Installation Accuracy is everything. If your measurements are off by even an inch, the whole structure could be crooked or fail to drain properly. * **Height Clearance:** Ensure the lowest point of the awning (the front gutter) is at least 7 feet high to allow for comfortable walking. * **Door Swing:** If you have an outward-swinging door, you generally need at least 12 inches of clearance above the door frame to accommodate the awning hardware. * **Level Lines:** Use a chalk line and a long level to mark exactly where the wall hanger will go. * **Diagonal Measurements:** To ensure the frame is "square," measure diagonally from corner to corner. If the two diagonal numbers match, your frame is perfectly rectangular. ## Essential Tools and Materials for the Job Installing a structural metal awning isn't a project you can do with just a screwdriver and a hammer. You’ll need a robust kit to ensure the structure stays put during a Utah windstorm. **The Professional Toolkit:** * **Power Drill & Impact Driver:** For driving long lag bolts into studs. * **Masonry Bits:** If you’re mounting onto brick or concrete. * **Level & Chalk Line:** To keep everything straight. * **Socket Set:** Usually 9/16” or 1/2” for tightening structural bolts. * **Metal Snips:** For any field-cutting needed on fascias or downspouts. **Materials:** * **Wall Hanger/Ledger Board:** The backbone of the installation. * **Lag Bolts & Masonry Anchors:** These must be at least 3 inches long to reach the structural framing. * **High-Grade Silicone Sealant:** For weatherproofing every single screw hole. * **Fascias & Gutters:** To manage water runoff. ### Safety Precautions During Metal Awning Installation Safety isn't just a suggestion; it's a requirement when working with heavy metal components. 1. **Ladder Safety:** Always use a sturdy A-frame or extension ladder on level ground. Never stand on the top rung. 2. **Sharp Edges:** Aluminum panels and fascias can be razor-sharp. Wear heavy-duty work gloves and long sleeves. 3. **Heavy Lifting:** This is a two-person job, minimum. Trying to hold a 12-foot wall hanger level while drilling is a recipe for a trip to the ER. 4. **Electrical Lines:** Be extremely mindful of power lines entering your home. Aluminum is an excellent conductor of electricity. ## Step-by-Step Guide to Metal Awning Installation Ready to get to work? Whether you're following our [DIY awning installation tips](https://awnings-unlimited.com/tag/diy-awning-installation/) or just want to understand the process, here is the standard workflow for a structural metal cover. ### 1. Secure the Mounting Hardware Start by finding the studs in your wall. You cannot simply mount an awning to siding or brick veneer; the bolts must bite into the structural wood framing of the house. Drill pilot holes to prevent the wood from splitting, then apply a generous amount of caulk into the hole before driving in your lag bolts. This creates a water-tight seal that prevents rot inside your walls. ### 2. Assemble the Frame Once the wall hanger is secure, it’s time to build the "skeleton." This involves attaching the side fascias and the front gutter. If your awning requires support posts (common for larger patio covers), you'll set these in post brackets. For a [metal carport installation](https://awnings-unlimited.com/metal-carports-installed/), this step is even more critical as the posts must be perfectly plumb and level to support the roof weight. ### 3. Install the Panels Starting from one side (usually the left), slide the first panel into the wall hanger and secure it to the front fascia. The next panel will "interlock" with the first. You may need to use a rubber mallet to gently tap them into place. Ensure they are seated fully to prevent leaks. ### 4. Pitch Adjustment A flat awning is a leaky awning. You need a "pitch" or slope to ensure water runs toward the gutter. A good rule of thumb is a 1-inch to 2-inch drop for every foot of projection. For example, a 10-foot deep awning should be 10 to 20 inches lower at the front than at the wall. ### Finalizing the Metal Awning Installation Process With the panels in place, it’s time for the finishing touches. If your kit includes a shroud (a decorative hood that covers the wall connection), install that now. Next, position your downspouts. Use a level to find the lowest point of the gutter and install the drop elbow there. This ensures that even during a light drizzle, water doesn't pool in the corners. Finally, do a "stability check." Give the posts and the frame a firm shake. There should be zero wiggle room. If it moves, tighten your bolts! ## Professional vs. DIY: Costs and Considerations We get asked all the time: "Can I do this myself?" The answer is yes, but it comes with caveats. | Feature | DIY Installation | Professional Installation | | :--- | :--- | :--- | | **Upfront Cost** | Lower (Materials only) | Higher (Labor + Materials) | | **Tools Required** | Significant investment | Included | | **Time** | 2-3 weekends | 1 day | | **Warranty** | Manufacturer only | Manufacturer + Labor Warranty | | **Safety** | High risk (Ladders/Heavy metal) | Low risk (Insured pros) | | **Structural Integrity** | Dependent on your skill | Guaranteed to meet code | While DIY might save you some money on labor, many homeowners find that [professional awning installation is worth it](https://awnings-unlimited.com/why-professional-awning-installation-is-worth-it/) for the peace of mind alone. At Awnings Unlimited, our crews have the specialized equipment to handle heavy Alumawood beams and the experience to ensure your home remains weather-tight. ### Common Mistakes to Avoid During Metal Awning Installation * **Incorrect Pitch:** If the awning is too flat, snow will pile up and water will back up under your shingles. * **Poor Sealing:** Skipping the caulk on a single screw hole can lead to thousands of dollars in water damage inside your home's walls. * **Missed Studs:** Bolting into just the "sheathing" (the thin plywood under your siding) is a recipe for the awning falling down during the first heavy snow. * **Ignoring Codes:** Nothing is worse than finishing a project only to have a city inspector tell you to tear it down because it's too close to the sidewalk. ## Maintenance and Longevity of Structural Metal Awnings One of the best things about a **metal awning installation**—especially when using Alumawood—is how little work it requires. It won't rot, peel, or host termites, and it is engineered to resist fading or damage even in a windstorm. To keep your awning looking new: 1. **Debris Removal:** Every spring and fall, clear leaves and twigs out of the gutters. Clogged gutters lead to standing water and potential leaks. 2. **Mild Soap:** Use a garden hose and a soft brush with mild soap to wash away dust and bird droppings. 3. **Inspection:** Once a year, check the caulking around the wall hanger. If it looks cracked, scrape it out and apply a fresh bead of silicone. 4. **Snow Load:** While our awnings are built for Utah winters, it's always a good idea to gently brush off extreme snow accumulations (2+ feet) to reduce stress on the structure. ### Weatherproofing and Sealing Techniques Weatherproofing is the "secret sauce" of a long-lasting installation. We use high-quality flashing to bridge the gap between your home's roof and the new awning. For siding installations, we often use foam blocks behind the fascias to create a snug fit that keeps out wasps and moisture. Corrosion inhibitors can also be applied to any field-cut edges to ensure the aluminum remains rust-free for decades. ## Frequently Asked Questions about Metal Awnings ### How long does a typical metal awning installation take? For a professional crew, a standard residential patio cover usually takes one full day. A DIY project typically takes two people a full weekend, assuming you have all the tools ready to go. ### Can structural metal covers be installed on existing patio frames? In some cases, yes! However, it depends on the load-bearing capacity of the existing structure. We often perform retrofits where we add solid metal panels to an existing frame to provide 100% shade and rain protection. ### What kind of warranty comes with a professional metal awning? When you work with Awnings Unlimited, you get the best of both worlds. Our Alumawood products come with a leading manufacturer's warranty against peeling and cracking, and we back our craftsmanship with our own professional guarantee. ## Conclusion Upgrading your home with a structural metal awning is one of the most practical investments you can make. It transforms an unused, sweltering patio into a comfortable outdoor living room and protects your home's interior from fading in the harsh Utah sun. Since 1976, Awnings Unlimited has been the trusted name for shade in Salt Lake City, Provo, and across the Wasatch Front. As a family-owned business, we take pride in our work, ensuring every **metal awning installation** we perform is built to withstand the unique challenges of our mountain climate. Whether you're looking for the classic beauty of Alumawood or a heavy-duty carport, we have the expertise to get the job done right. Ready to protect your home and enjoy the outdoors? [Start your project with a custom carport or awning today](https://awnings-unlimited.com/carports/) and see why we’ve been Utah’s shade experts for nearly 50 years.](https://awnings-unlimited.com/wp-content/uploads/2026/02/1078085548960458382_compressed-2-1080x675.jpeg)
Why Metal Awning Installation Is One of the Best Upgrades for Your Home
Metal awning installation is a smart, lasting way to add shade, weather protection, and curb appeal to your home or business. Here’s a quick overview of how the process works:
- Plan your space – measure the area, check local building codes, and confirm your mounting surface is structurally sound
- Choose your awning – select the right size, style, and material (aluminum and Alumawood are top choices for durability)
- Gather tools and materials – drill, level, lag bolts, masonry anchors, sealant, and safety gear
- Install the frame – secure the wall hanger, assemble fascias, and set support posts
- Attach the panels – interlock metal panels from left to right, lock into place
- Seal and finish – caulk all joints, install gutters and downspouts, do a final stability check
Metal awnings are built to last, holding up against heavy snow, wind, and intense sun – making them especially valuable in climates with extreme seasonal weather. They also add real, lasting value to your property.
Whether you’re covering a patio or a large structural outdoor space, the installation process follows a clear set of steps. But getting it right matters – the wrong pitch, missed studs, or poor sealing can cause big problems down the road.
At Awnings Unlimited, we’ve been handling professional metal awning installation across Northern Utah since 1976, using durable, eco-friendly materials like Alumawood by Amerimax to deliver custom results built for harsh Utah winters and hot summers. In this guide, we’ll walk you through everything you need to know – from planning and prep to final finishing touches.
 Long-term durability vs fabric awnings, 2) Weather protection from snow, rain, and UV rays, 3) Increased home value and curb appeal, 4) Low maintenance with aluminum and Alumawood materials, 5) Custom sizing for residential patios, entryways, and commercial storefronts - with icons for each benefit and a simple step-by-step installation overview showing planning, measuring, framing, panel attachment, and sealing - metal awning installation infographic")
Planning and Preparation for Metal Awning Installation
Before you pick up a drill, you need a solid plan. A successful metal awning installation starts with a thorough site assessment. In our experience working across the Wasatch Front, from Salt Lake City to Ogden, we’ve seen how the local environment dictates the best approach.
First, consider the sun angle. If your goal is to cool your home, you’ll want to ensure the awning projection is deep enough to block the high summer sun while allowing for a bit of warmth in the winter. Next, evaluate your drainage flow. Where will the water go during a heavy downpour? You don’t want a waterfall landing right on your back doorstep.
Structural integrity is the most critical part of the prep phase. You must confirm that the mounting surface—whether it’s brick, siding, or stucco—can support the weight and the wind load of a structural metal cover. This is especially true for carport installation, where the spans are often much larger.
Finally, don’t forget the legal side. Building codes and permit requirements vary between Utah and Wyoming. Most cities in Northern Utah, like Sandy or Draper, have specific regulations regarding how far a structure can extend toward a property line. Always check with your local building department or refer to the International Code Council for general structural guidelines before starting, or hire a professional awning installation service to handle the red tape for you.

Choosing the Right Size and Style
When selecting your awning, you need to balance function with fashion. The “width” refers to how far the awning runs along the wall, while the “projection” is how far it sticks out into the yard.
For a classic, high-end look, many of our clients in Park City and Heber City choose Alumawood. It offers the beauty of real wood with the lifetime durability of aluminum. You can choose between standing seam styles for a modern industrial look or interlocking aluminum panels for a clean, seamless finish. Color matching is also vital; we recommend choosing a shade that complements your home’s trim or fascia for a cohesive architectural style.
Measuring Your Space for Metal Awning Installation
Accuracy is everything. If your measurements are off by even an inch, the whole structure could be crooked or fail to drain properly.
- Height Clearance: Ensure the lowest point of the awning (the front gutter) is at least 7 feet high to allow for comfortable walking.
- Door Swing: If you have an outward-swinging door, you generally need at least 12 inches of clearance above the door frame to accommodate the awning hardware.
- Level Lines: Use a chalk line and a long level to mark exactly where the wall hanger will go.
- Diagonal Measurements: To ensure the frame is “square,” measure diagonally from corner to corner. If the two diagonal numbers match, your frame is perfectly rectangular.
Essential Tools and Materials for the Job
Installing a structural metal awning isn’t a project you can do with just a screwdriver and a hammer. You’ll need a robust kit to ensure the structure stays put during a Utah windstorm.
The Professional Toolkit:
- Power Drill & Impact Driver: For driving long lag bolts into studs.
- Masonry Bits: If you’re mounting onto brick or concrete.
- Level & Chalk Line: To keep everything straight.
- Socket Set: Usually 9/16” or 1/2” for tightening structural bolts.
- Metal Snips: For any field-cutting needed on fascias or downspouts.
Materials:
- Wall Hanger/Ledger Board: The backbone of the installation.
- Lag Bolts & Masonry Anchors: These must be at least 3 inches long to reach the structural framing.
- High-Grade Silicone Sealant: For weatherproofing every single screw hole.
- Fascias & Gutters: To manage water runoff.
Safety Precautions During Metal Awning Installation
Safety isn’t just a suggestion; it’s a requirement when working with heavy metal components.
- Ladder Safety: Always use a sturdy A-frame or extension ladder on level ground. Never stand on the top rung.
- Sharp Edges: Aluminum panels and fascias can be razor-sharp. Wear heavy-duty work gloves and long sleeves.
- Heavy Lifting: This is a two-person job, minimum. Trying to hold a 12-foot wall hanger level while drilling is a recipe for a trip to the ER.
- Electrical Lines: Be extremely mindful of power lines entering your home. Aluminum is an excellent conductor of electricity.
Step-by-Step Guide to Metal Awning Installation
Ready to get to work? Whether you’re following our DIY awning installation tips or just want to understand the process, here is the standard workflow for a structural metal cover.
1. Secure the Mounting Hardware
Start by finding the studs in your wall. You cannot simply mount an awning to siding or brick veneer; the bolts must bite into the structural wood framing of the house. Drill pilot holes to prevent the wood from splitting, then apply a generous amount of caulk into the hole before driving in your lag bolts. This creates a water-tight seal that prevents rot inside your walls.
2. Assemble the Frame
Once the wall hanger is secure, it’s time to build the “skeleton.” This involves attaching the side fascias and the front gutter. If your awning requires support posts (common for larger patio covers), you’ll set these in post brackets. For a metal carport installation, this step is even more critical as the posts must be perfectly plumb and level to support the roof weight.
3. Install the Panels
Starting from one side (usually the left), slide the first panel into the wall hanger and secure it to the front fascia. The next panel will “interlock” with the first. You may need to use a rubber mallet to gently tap them into place. Ensure they are seated fully to prevent leaks.
4. Pitch Adjustment
A flat awning is a leaky awning. You need a “pitch” or slope to ensure water runs toward the gutter. A good rule of thumb is a 1-inch to 2-inch drop for every foot of projection. For example, a 10-foot deep awning should be 10 to 20 inches lower at the front than at the wall.
Finalizing the Metal Awning Installation Process
With the panels in place, it’s time for the finishing touches. If your kit includes a shroud (a decorative hood that covers the wall connection), install that now.
Next, position your downspouts. Use a level to find the lowest point of the gutter and install the drop elbow there. This ensures that even during a light drizzle, water doesn’t pool in the corners. Finally, do a “stability check.” Give the posts and the frame a firm shake. There should be zero wiggle room. If it moves, tighten your bolts!
Professional vs. DIY: Costs and Considerations
We get asked all the time: “Can I do this myself?” The answer is yes, but it comes with caveats.
| Feature | DIY Installation | Professional Installation |
|---|---|---|
| Upfront Cost | Lower (Materials only) | Higher (Labor + Materials) |
| Tools Required | Significant investment | Included |
| Time | 2-3 weekends | 1 day |
| Warranty | Manufacturer only | Manufacturer + Labor Warranty |
| Safety | High risk (Ladders/Heavy metal) | Low risk (Insured pros) |
| Structural Integrity | Dependent on your skill | Guaranteed to meet code |
While DIY might save you some money on labor, many homeowners find that professional awning installation is worth it for the peace of mind alone. At Awnings Unlimited, our crews have the specialized equipment to handle heavy Alumawood beams and the experience to ensure your home remains weather-tight.
Common Mistakes to Avoid During Metal Awning Installation
- Incorrect Pitch: If the awning is too flat, snow will pile up and water will back up under your shingles.
- Poor Sealing: Skipping the caulk on a single screw hole can lead to thousands of dollars in water damage inside your home’s walls.
- Missed Studs: Bolting into just the “sheathing” (the thin plywood under your siding) is a recipe for the awning falling down during the first heavy snow.
- Ignoring Codes: Nothing is worse than finishing a project only to have a city inspector tell you to tear it down because it’s too close to the sidewalk.
Maintenance and Longevity of Structural Metal Awnings
One of the best things about a metal awning installation—especially when using Alumawood—is how little work it requires. It won’t rot, peel, or host termites, and it is engineered to resist fading or damage even in a windstorm.
To keep your awning looking new:
- Debris Removal: Every spring and fall, clear leaves and twigs out of the gutters. Clogged gutters lead to standing water and potential leaks.
- Mild Soap: Use a garden hose and a soft brush with mild soap to wash away dust and bird droppings.
- Inspection: Once a year, check the caulking around the wall hanger. If it looks cracked, scrape it out and apply a fresh bead of silicone.
- Snow Load: While our awnings are built for Utah winters, it’s always a good idea to gently brush off extreme snow accumulations (2+ feet) to reduce stress on the structure.
Weatherproofing and Sealing Techniques
Weatherproofing is the “secret sauce” of a long-lasting installation. We use high-quality flashing to bridge the gap between your home’s roof and the new awning. For siding installations, we often use foam blocks behind the fascias to create a snug fit that keeps out wasps and moisture. Corrosion inhibitors can also be applied to any field-cut edges to ensure the aluminum remains rust-free for decades.
Frequently Asked Questions about Metal Awnings
How long does a typical metal awning installation take?
For a professional crew, a standard residential patio cover usually takes one full day. A DIY project typically takes two people a full weekend, assuming you have all the tools ready to go.
Can structural metal covers be installed on existing patio frames?
In some cases, yes! However, it depends on the load-bearing capacity of the existing structure. We often perform retrofits where we add solid metal panels to an existing frame to provide 100% shade and rain protection.
What kind of warranty comes with a professional metal awning?
When you work with Awnings Unlimited, you get the best of both worlds. Our Alumawood products come with a leading manufacturer’s warranty against peeling and cracking, and we back our craftsmanship with our own professional guarantee.
Conclusion
Upgrading your home with a structural metal awning is one of the most practical investments you can make. It transforms an unused, sweltering patio into a comfortable outdoor living room and protects your home’s interior from fading in the harsh Utah sun.
Since 1976, Awnings Unlimited has been the trusted name for shade in Salt Lake City, Provo, and across the Wasatch Front. As a family-owned business, we take pride in our work, ensuring every metal awning installation we perform is built to withstand the unique challenges of our mountain climate. Whether you’re looking for the classic beauty of Alumawood or a heavy-duty carport, we have the expertise to get the job done right.
Ready to protect your home and enjoy the outdoors? Start your project with a custom carport or awning today and see why we’ve been Utah’s shade experts for nearly 50 years.