


Why Building an Awning Over a Patio Is One of the Best Home Upgrades You Can Make
Building an awning over a patio is one of the most practical home improvement projects you can tackle — and you can do it yourself for as little as $100 to $300.
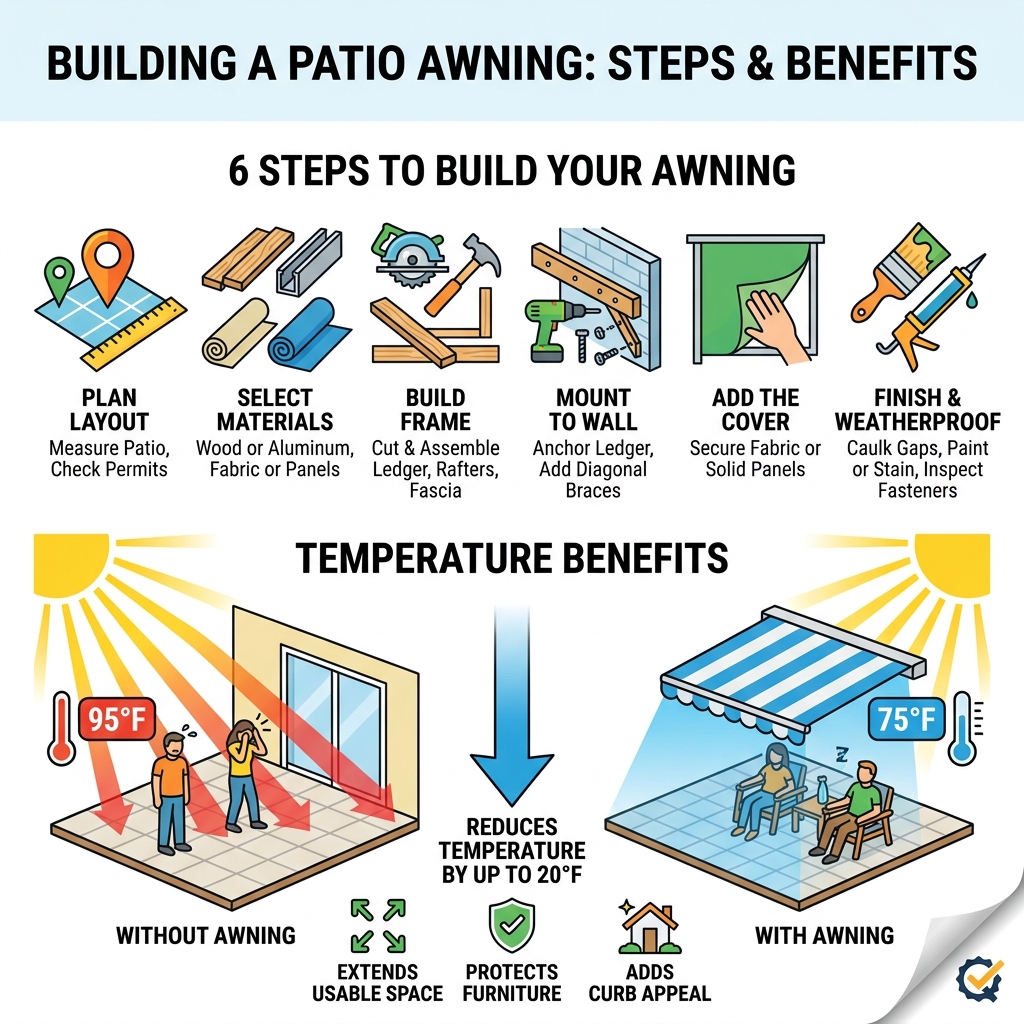
Here’s a quick overview of how it works:
- Plan your layout — Choose your location, measure your patio width and projection depth, and check local permit requirements
- Select your materials — Pressure-treated wood or aluminum for the frame; acrylic, vinyl, or canvas for the cover
- Build the frame — Cut and assemble a ledger board, rafters, and fascia board on the ground
- Mount it to the wall — Anchor the ledger to wall studs using lag bolts, then attach diagonal braces for support
- Add the cover — Secure your chosen fabric or solid panel material to the top of the frame
- Finish and weatherproof — Caulk gaps, paint or stain wood, and inspect all fasteners
A well-built structural patio awning does more than block the sun. It extends your usable outdoor space, protects your furniture, reduces indoor temperatures, and adds real curb appeal to your home. In fact, awnings can reduce patio temperatures by up to 20 degrees Fahrenheit — making a huge difference on a hot summer afternoon.
Whether you’re a confident DIYer or exploring your options before calling in a pro, this guide covers everything you need to know.
At Awnings Unlimited, we’ve been helping Utah homeowners with building an awning over a patio since 1976, specializing in durable structural patio covers built to handle everything from intense summer heat to harsh winter conditions. We’re here to help you make the right call — whether you go DIY or want a custom professional installation.
Benefits of Building an Awning Over a Patio
When we talk about building an awning over a patio, we aren’t just talking about a bit of shade. We’re talking about reclaiming your backyard from the scorching Utah sun. If you’ve ever tried to host a barbecue in Salt Lake City in July, you know that without cover, your guests are basically just “slow-cooking” alongside the brisket.
Superior UV Protection
The most immediate benefit is protection from UV rays. High-quality awning materials block a significant portion of harmful radiation, allowing your family to enjoy the fresh air without the constant worry of sunburns. This is especially vital in high-altitude areas like Park City or Heber City, where the sun hits just a little bit harder.
Energy Efficiency and Indoor Cooling
Believe it or not, an awning helps your indoor climate too. By shading windows and sliding glass doors, you prevent the “greenhouse effect” from heating up your living room. This reduces the load on your HVAC system, leading to lower energy bills. It’s one of the few home upgrades that actually pays you back over time.
Furniture Longevity
Outdoor furniture is an investment. Whether you have teak wood or modern wicker, constant exposure to sun and rain will cause fading, cracking, and mold. A structural cover acts as a shield, keeping your cushions dry and your table finishes intact. For more on how different covers achieve this, check out Patio Covers 101: Materials, Styles, and Maintenance Tips.
Curb Appeal and Property Value
A well-designed awning adds architectural interest. It breaks up flat exterior walls and creates a defined “outdoor room.” In the Utah real estate market, a functional, shaded patio is a major selling point that can boost your home’s resale value.
| Feature | Wood Structural Awning | Aluminum Structural Awning |
|---|---|---|
| Durability | High (Requires maintenance) | Very High (Weather resistant) |
| Maintenance | Moderate (Staining/Painting) | Low (Occasional cleaning) |
| Shade Control | Permanent | Permanent |
| Cost | Generally lower for DIY | Higher (Professional kits) |
| Weather Protection | Full-time rain/snow protection | Full-time rain/snow protection |
Planning and Choosing Materials for Your Project
Before you grab the saw, you need a plan. Building an awning over a patio requires matching the right materials to your specific environment. In Northern Utah, we have to consider heavy snow loads in the winter and high winds coming off the canyons.
Location and Sun Exposure
Trace the sun’s movement across your patio. South-facing walls receive the most intense light throughout the day. If your patio faces west, you’ll deal with that harsh, low-angle afternoon sun that sneaks in under the front of the awning. You might need a deeper projection or a drop valance to stay comfortable. For a deep dive into different configurations, see The Ultimate Guide to Patio Cover Types: Insulated, Modern, Freestanding, and More.
Material Selection: Wood vs. Aluminum
- Pressure-Treated Wood: This is the go-to for DIYers. It’s affordable, easy to work with, and offers a classic look. However, it requires regular staining or painting to prevent rot.
- Aluminum and Alumawood: At Awnings Unlimited, we often recommend Alumawood. It gives you the beautiful texture of woodgrain but with the durability of 100% aluminum. It won’t rust, warp, or host termites—perfect for the varied climates of the Wasatch Front.
- Fabric Covers: If you prefer a softer look, choose acrylic or vinyl-coated polyester. Marine-grade canvas is excellent for breathability, while vinyl is superior for complete waterproofing.

Measuring for building an awning over a patio
Accuracy is everything here. If your measurements are off by an inch, your ledger board won’t hit the studs, and your awning might literally “take flight” during the next windstorm.
- Clearance Height: A general rule of thumb is a minimum of 8 feet of clearance from the ground to the lowest part of the awning frame. This ensures people don’t bump their heads and allows for door clearance.
- Projection Depth: How far out do you want the shade? Most DIY wood awnings project between 3 to 8 feet. If you go further, you’ll likely need support posts rather than just wall braces.
- Pitch Calculation: You need a “slope” so water doesn’t pool on top. Aim for a 2-inch drop per foot of projection. For example, if your awning sticks out 4 feet, the front should be 8 inches lower than the back.
- Stud Spacing: Standard home framing uses studs spaced every 16 or 24 inches. You must locate these to secure your ledger board.
Step-by-Step Guide to Building a Simple Wooden Fixed Awning
Ready to get your hands dirty? Building a fixed wooden awning is a satisfying weekend project. It provides a permanent structural addition to your home that looks great and performs even better.
Tools and Materials Required
- Tools: Miter saw, power drill/driver, 4-foot level, tape measure, chalk line, and a sturdy ladder.
- Lumber: 2×4 or 2×6 pressure-treated boards for the ledger, rafters, and fascia.
- Fasteners: 3/8-inch lag bolts (at least 4 inches long), structural wood screws, and galvanized joist hangers.
- Covering: Corrugated metal, polycarbonate panels, or outdoor fabric.
For a detailed look at professional standards, refer to our Residential Awning Installation Guide.
Structural assembly for building an awning over a patio
Step 1: Locate and Prepare the Wall Find your wall studs. Since stud finders struggle with exterior siding, try measuring from an interior window or door frame and transferring that measurement outside. Mark your height, ensuring you have enough room above the door frame.
Step 2: Install the Ledger Board The ledger is the “backbone” of your awning. Cut it to your desired width. Drill pilot holes every 16 or 24 inches to match your studs. Hold the board up (this is where a helper is mandatory!), level it perfectly, and drive your lag bolts through the ledger and into the house framing. Pro tip: Apply silicone caulk into the pilot holes before inserting bolts to prevent water from seeping into your walls.
Step 3: Layout and Cut Rafters Mark your rafter locations on the ledger every 24 inches. Cut your rafters to length, including a miter cut on the end for the desired pitch. If you want a decorative look, you can cut the ends of the rafters into a “corbel” or “scalloped” shape.
Step 4: Assemble the Frame Attach the rafters to the ledger using joist hangers or long structural screws. Once the rafters are out, attach the fascia board across the front. This “boxes” the frame and provides lateral stability.
Step 5: Add Diagonal Braces For a wall-mounted awning without posts, you need diagonal braces. These run from the bottom of the wall (secured to studs) up to the middle or front of the rafters at a 45-degree angle. These braces transfer the weight of the awning back to the house foundation.
Step 6: Secure the Covering If using fabric, stretch it tight and secure it with staples or grommets. If using solid panels like corrugated metal, use roofing screws with rubber washers to prevent leaks.
Step 7: Finishing Touches Caulk the seam where the ledger meets the house. Paint or stain the wood to match your home’s trim. If you’re in a rainy area like Bountiful or Farmington, consider adding a small gutter to the front fascia to direct water away from your patio steps.
Advanced Options: Metal and PVC Structural Systems
While a fixed wood awning is a classic DIY choice, some homeowners prefer the industrial durability of metal or the low maintenance of synthetic materials for their permanent patio covers.
Metal and PVC Alternatives
For a more modern look, some use cPVC or lightweight aluminum tubing. Aluminum is particularly popular in Utah because it doesn’t rust despite our snowy winters. If you are curious about the price difference between these systems, our Awning Installation Costs Complete Guide breaks down the numbers.
Installing a metal structural awning over a patio
If you purchase a metal structural kit, the installation focus shifts to the mounting brackets and support posts. These must be perfectly level and anchored into solid headers or studs. Most structural kits are designed to handle specific snow loads, which is a lifesaver if you live in a high-elevation area. Unlike wood, these systems often feature integrated drainage to ensure water doesn’t pool on the roof surface.
Safety, Permits, and Structural Requirements
We can’t stress this enough: safety first. Building an awning over a patio involves heavy materials and working at heights.
Building Codes and Permits
Do you need a permit? In many Utah cities like Sandy, Draper, or Orem, small structural awnings (often under 120-200 square feet) may not require a full building permit, but they must still meet local building codes. Always check with your local building department before you start. If you’re attaching a large structure that could affect the integrity of your roofline, a permit is almost certainly required.
Structural Integrity
Your house wall needs to be able to handle the “leverage” of the awning. Think of the awning as a giant lever trying to pull the bolts out of the wall. This is why anchoring to studs is non-negotiable. If you have masonry (brick or stone), you must use expansion anchors or sleeve anchors designed for heavy loads.
Weather Protection and Load
In places like Lehi or Eagle Mountain, wind can be a major factor. Your awning needs to be designed to withstand “uplift.” Similarly, if you live in Logan or Ogden, you have to account for snow load. A fabric awning should be cleared of snow, while a solid wood or metal cover must be strong enough to hold the weight. For more on the benefits of professional-grade durability, see Why Choose Professional Patio Cover Installation.
Personal Safety
- Ladder Safety: Always have a helper hold the ladder.
- Eye Protection: Sawing pressure-treated wood releases chemicals you don’t want in your eyes.
- Helper Requirements: Never try to mount a ledger board or lift a frame alone. It’s a recipe for a trip to the ER and a hole in your siding.
Maintenance and Common Mistakes to Avoid
A DIY awning is only as good as its upkeep. Without maintenance, that beautiful wood frame will be grey and rotting within five years.
Cleaning and Inspections
Develop a seasonal routine. Every spring, inspect the lag bolts to ensure they haven’t loosened. Clean the fabric with mild soap and water to prevent bird droppings or tree sap from eating through the UV coating. If you have a wood frame, plan to re-stain it every 2-3 years. Check out How to Extend the Life of Your Home’s Awning with These Tips for more advice.
Common DIY Mistakes
- Inaccurate Measurements: “Measuring once and cutting twice” is a great way to waste money. Double-check everything.
- Poor Pitch: If the awning is too flat, water will pool, the fabric will sag, and eventually, the whole thing could collapse under the weight of a heavy rainstorm.
- Cheap Hardware: Don’t use standard wood screws for structural connections. Use galvanized lag bolts and structural fasteners that won’t rust or shear off.
- Ignoring the Wind: If you live in a high-wind area, a lightweight “tarp-style” awning will shredded in minutes. Ensure your fabric is tight and your frame is rigid.
Sometimes, the complexity of the project outweighs the savings of doing it yourself. If you’re unsure, read our guide on DIY Awning Installation vs Hiring a Pro in Utah.
Frequently Asked Questions about Patio Awnings
Do I need a building permit for a DIY patio awning?
It depends on your specific city and the size of the awning. Generally, small structural awnings do not require a permit. However, if the awning is large, attached to the roof, or involves electrical work (for lights), you should check with your local Utah building department.
How much does a DIY patio awning cost compared to professional installation?
A basic DIY wood and fabric structural awning can cost between $100 and $500 in materials. Professional installations, which often use high-grade aluminum and come with warranties, typically start at $1,500 and go up based on size and complexity. While DIY is cheaper upfront, professional structural installs often provide better long-term value through durability and increased home equity.
What is the best material for a long-lasting patio cover?
For the frame, aluminum (specifically Alumawood) is the gold standard because it won’t rot or rust. For the cover, solution-dyed acrylic fabric (like Sunbrella) is the most fade-resistant and breathable option, while polycarbonate or aluminum panels offer the best protection against heavy snow and rain.
Conclusion
Building an awning over a patio is a fantastic way to transform your backyard into a functional, comfortable oasis. Whether you choose the rustic charm of a DIY wooden frame or the sleek functionality of a modern metal system, the goal is the same: more time spent enjoying the outdoors with the people you love.
Don’t forget the finishing touches! Adding some outdoor LED string lights or a ceiling fan can take your new shaded space from “nice” to “the neighborhood hangout spot.”
If you’ve read through this guide and decided that you’d rather have the experts handle the heavy lifting, we’re here for you. At Awnings Unlimited, we take pride in our craftsmanship and use only the most durable materials designed for our unique Utah climate. We serve the entire Wasatch Front, from Provo to Ogden and everywhere in between.
Ready to take your patio to the next level? Get a Quote today and let us help you build the perfect outdoor retreat!